• Skip to primary navigation
  • Skip to content
  • Skip to primary sidebar
  • Skip to footer

SkinTrack

  • Lightest Gear
    • Skis
    • Boots
    • Bindings
    • Skins
    • Packs
  • Skimo Training
    • Training Plans + Skimo Manual
    • Transitions Videos
  • Facebook
  • Instagram

Training, Tricks & Tips

Why you don't need new very light gear right away, and my skimo gear progress

October 17, 2013 By Stano Faban 5 Comments

In recent months I have received couple of questions about my ski mountaineering racing gear, specifically, how I lightened up over the years. To give you an idea, here are examples of the nature of those questions:

  • What gear did you start on?
  • When did you switch to the lightest?
  • Should I get product X, Y, Z if I want to start racing?

So in this post I want to share my thoughts on the need people feel about light weight ski mountaineering racing gear.  And at the same time offer advice on how they can go about their choices as they progress.

My skimo gear evolution

I have the exact same one. Picture borrowed from WildSnow.com archives.
I did my first skimo race when I was about 15 years old. It was about 1500m of climbing and the whole thing was in pure backcountry. It took me well over three hours (winners were under two) and I did it on a pair of 180cm skis (about 75mm under foot and 1800g per ski). The bindings were well used legendary Silvretta 300 (about 800g per foot) and boots some kind of Dynafits. To super charge the kit I had normal ski poles, some kind of a backpack, and cycling clothing mostly.
At the time, that was my only ski touring setup and so I did everything on it. It was great, I enjoyed it very much but I sure noticed that all the folks in the front were on some weird pin based bindings which seemed very light and breakable (first Dynafits).
dynafit-tlt-3-boots
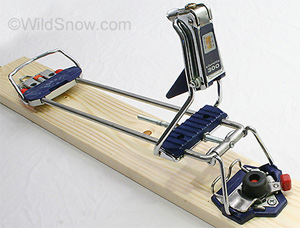
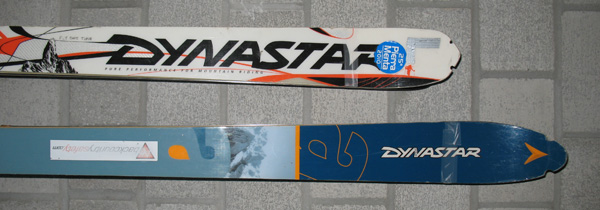
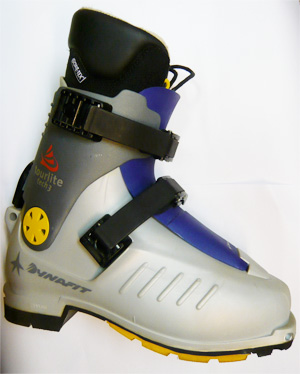
Few years later I got a brand new ski touring kit which was also much more suitable for racing. This consistent of one of the lightest boots at the time – the Dynafit TLT 3 skied like shit and was about 1500g per boot. On recommendations about durability my bindings became Dynafit TourLite Tech (later referred to as Classics) which were an astounding 340g per foot, and they were mounted on 178cm Dynastars (around 70mm wide and 1400g per ski). I placed 3rd at Slovak junior nationals on that gear.
For a comparison, the fast guys in men, junior and women categories in those times were mostly on the same boots as me but with lots of modifications. They had 165-175cm skis (about 950g per ski) mounted with either the same bindings as I or the Dynafit TLT toe piece coupled with random garage-manufactured heels (about 200g per foot).
I have ski toured and raced that same setup for couple of years until I broke the skis, in around 2004. Then I bought another pair of 178cm Dynastars but this time 65mm wide and about 1100g. Boots were Scarpa F1, and the binding was my old faithful Dynafit TLTs. At the time this was quite a light setup for the North American racing scene but I certainly wasn’t the fastest guy around. Greg Hill, Steve Romeo, Chris Kroger and others were kicking my ass by a lot.
Then for about two years I almost didn’t race at all as I was working and out of shape. However, I had my last light setup safely stored in the basement just in case.
Fast-forward to early 2008 and the “just in case” happened – I raced couple of times and organized one race, helping with others. By this time, people caught up and you could see all the front guys on short skinny skis and almost everyone was on Scarpa F1s, some even wore spandex. (This is referring to NA scene.)
I still rocked the same setup for the early 2009 season but this time with more training (and no full time job) I was able to finally get on some podiums. Then during that season I got a light pair of 164cm at 900g skis and combined the well-used Dynafit toe pieces with ATK heels, which gave me a setup of about 1100g per ski. Still on my old F1s for boots.
I continued to race that same setup over the 2010 season and did Skimo World Champs and Pierra Menta on it. By this time the Euros were racing on way lighter gear (720g skis, 115g bindings, 700g carbon boots) and North Americans on about the same weight as me.
My all time favourite pair of skis I ever had, the white Dynastar Pierra Menta at 164cm.
My all time favourite pair of skis I ever had, the white Dynastar Pierra Menta at 164cm. The blue/green model is their predecessor which I had in 178cm. I keep them as reminders of great memories.
Before the 2011 season it dawned on me that if I wanted to stay competitive not only more training was needed but the lightest gear will be an absolute must even for challenging any Canadian podium. And as the season rolled around the corner we were all on-pair with the Euros in terms of gear weight.
I ended up racing on second-hand Pierre Gignoux (fitted with my 5 years old F1 liners) and a pair of 870g skis (including bindings) till the end of 2013 season.
As of now, like many of you, I am looking for a new setup. The options are plenty but also pricey.

My advice for “racing” gear

Unless you have too much money to spare then I believe your skimo gear selection should be based on priorities and goals.
Today’s marketplace offers much better choices in terms of going light yet compromise very little in terms of gear performance. Ten years ago, if you wanted to go very light you were stuck with strictly racing gear. It was good for that but not much for anything else.
These days, you can have a 75mm ski that is even below 1kg that is great for lots of other skiing than just running up mountains.
But back to priorities and goals – let’s define some situations you might be finding yourself in right now.

1) Doing your first races

I assure you you can do your first couple of races on whatever you have at the moment and still have fun and see whether it’s something you will enjoy for longer.
If you think it’s way too heavy then perhaps you can pick up a new or a used pair of Dynafit Broad Peak skis (74mm and about 1200g) or Dynafit Cho Oyu (87mm and about 1100g), TLT 5 or TLT 6 boots (1050g) and whatever tech style bindings you want. Or an equivalent of those pieces of gear.
Such a setup will allow you to have gear that is light yet much more usable for other things than just racing, such as steep or spring skiing, or occasional ski resort days. And the boots will be usable with your big skis as well.
At this stage of your development you are trying a new activity and I bet you didn’t buy a $12,000 Pinarello when you were learning to bike 😉

2) You enjoy the racing and you want to progress

It’s great to be in this position as by now you figured out you absolutely love it and want to give yourself a chance to see how much better you can be. The spoiler is that more race specific gear will help you but training really is key.
But I assume you are hooked and are keeping fit so it might be time to step up to something lighter. From what is currently on the market, I think a wise choice to start is to lighten up your boots first. That will usually also bring a better ankle movement which results in a more efficient stride.
Again, you can buy new or used from any of these two without going wrong – Dynafit PDG boots (800g) and Scarpa Alien (850g).
Whether you get a pair of any of the two or you are happy with your current boots you should take a look at some lighter skis. Good choices will be anything around 800-1000g in just over 160cm for men and 150cm for women (due to ISMF rules on lengths). Some great options that will do for anything fast are:

  • Dynafit PDG skis (65mm wide)
  • Dynastar Pierra Menta Rocker skis (65mm)
  • SkiTrab Maestro (76mm)
  • various Movement skis – Random-X, Bond-X, Response-X (76-89mm)
  • Hagan  Cirrus (75mm)
  • Dynafit Nanga Parbat (79mm)

For bindings, you can go lighter than say Dynafit TLT Speed Radical (340g per foot) but then you are looking at investing in racing specific bindings for quite a bit more money.

3) You are fit as a horse and you want to challenge the best

If you belong to this category, whether through years of progress in skimo or coming from outside, then I advise you take a look at Skintrack’s lightest gear comparison pages. Here they are:

  • Skis – http://www.skintrack.com/skis-comparison/
  • Boots – http://www.skintrack.com/boots-comparison/
  • Bindings – http://www.skintrack.com/bindings-comparison/

You will need the combination of all three to be as light as possible to have a chance for a podium at most North American rando races.

What is the gear you have and what are your goals?

If you are having hard time to figure out your setup based on your goals and priorities drop me a line in comments below and I will try to navigate you towards the best option. Or anyone feel free to ask anything regarding this topic.

Filed Under: Gear, Tech & Food, Training, Tricks & Tips Tagged With: Dynafit PDG, Dynafit TLT6, Scarpa Alien, skimo racing gear

On Skimo Racing Summer Training: Interview with Adam Campbell, professional mountain runner

June 24, 2013 By Stano Faban 3 Comments

Last summer, I published two articles on summer training for skimo racing. One was about a general approach to summer skimo training – “Bread and butter” summer training for rando racing… The other one was about a more specific training method that I found helpful for my winter racing – Hiko-run: Skimo racer’s best summer friend.
Adam-Campbell-main-photoAfter the second one, Adam Campbell reacted to some of my “teachings” on Twitter – mainly, regarding the need for more high-intensity intervals during summer.  We went little bit back and forth but ultimately didn’t have time or will to seriously dissect whether we were disagreeing or misunderstanding each other.
So, being about time to commence training for the next season I have decided to approach Adam to provide us, the skimo community, with his idea for summer training that would set us up for success in the winter.

Who is Adam Campbell?

In Adam’s own words:
I’m a reformed lawyer and currently I’m a professional mountain runner, running for Arc’teryx & Salomon. (Adam is on Salomon’s team that includes Kilian Jornet.)
I was the 2011 & 2012 Canadian male ultra-runner of the year. Prior to that, I competed internationally for the Canadian U23 National Triathlon Team and was the Canadian Elite Duathlon Champion.
I’m also the proud owner of the Guinness Record for Running the Fastest Marathon in a Business Suit, in 2:35:53 –
http://www.nydailynews.com/life-style/man-breaks-world-record-running-marathon-suit-article-1.1180678
I also do some coaching for B78 Coaching and I am a part owner of the 5 Peaks Trail Running Series.
For more info & insights, you can check out:

  • https://twitter.com/campbelladam79
  • https://www.facebook.com/adam.campbell.58
  • http://cdamaampbell.blogspot.ca
  • http://www.arcteryx.com/Athlete.aspx?EN/AdamCampbell
  • http://vimeo.com/61635444

Adam on summer training for skimo racing

Q: I think we should discuss summer training for skimo racers on two levels – for occasional racers and those that like to keep fit  (REC category), and for the elite athletes shooting for spots on national teams and those seeking ultimate performance for their goals in the mountains (ELITE category).
In all cases, the emphasis is on efforts on less than 3h and the peak performances are expected to occur between January and March.
Do you agree we should address both groups specifically? If not, propose a better differentiation or none at all.
I definitely agree that both groups should be approached differently, simply because their ultimate goals are different. Because of that, their preparation will be slightly different.
As an elite athlete myself, preparation is something that I absolutely love. I treat racing as puzzle, where you have to scavenge around to find the right pieces to achieve your ultimate outcome.
It’s that process of scavenging for what I need to do to arrive on the starting line of my goal race as prepared to compete as I can be that I thrive on. It’s a trait I learned from Simon Whitfield, one of my closest friends and someone who’s sporting results on the day speak for themselves.
adam-campbell-racingI believe strongly in specificity, as well as having a strong aerobic foundation.
What differentiates an elite athlete from a recreational one is their single minded focus on a specific goal. I really admire recreational athletes, people who can simply play at a variety of sports and who enjoy participating for the sake of fitness, because it’s something I struggle with myself.
I try to give myself a few months of play a year, I think it’s healthy and ultimately helps your end goal, but I also tend to focus obsessively on my big objectives.
Because recreational athletes aren’t as concerned about nailing a narrow window of success, they can be a bit more loose in their approach to the sport.
But at the end of the day, no matter what your goals, I believe that training should be kept as simple as possible, with a big focus on the “meat & potatoes” of endurance sports, building that aerobic foundation, avoiding injuries and maintaining a good training frequency.
We called that the “chop wood & carry water approach”. If you’re getting that part right, which can be hard, you’re already a long way along the road to being competitive.
Too many people seem to look for shortcuts, or sexy workouts, in their training and forget about the meat and potatoes.
Q: For both groups, what would you advise skimo athletes to do between June and November, before we can really ski? How would you divide this big period into smaller ones? What would be the focus of each one? Variety or only trail running?
I would make sure that you start by taking a mental break from “training”. Some people believe in complete time off, so a one to two week holiday from endurance based sport might be good.
Personally, I’m a very active person and love to move, so in my off-season I do different sports, like indoor climbing, some bouldering, I bike a bit, I swim, I do yoga etc… but I also try to socialize a fair bit more. I run if I feel like it, but I am completely unstructured.
Once I feel the urge to start training again, I build back, trying to do something every day, but once again, I don’t really sweat it too much.
It’s a lot easier for runners, since we can run year round. Skiers can use this time a bit more creatively, mixing sports up, doing some hiking, running, biking etc…I would approach it that way until about August or September.
I would also use that time to address any imbalances or weaknesses that you noticed during the season and take care of any niggling injuries that inevitably come from high level training/racing.
In terms of energy system work, I would do one very high intensity workout, like 30-60 sec hill repeats, to maintain some explosive power, or I’d go to the gym if you like that. I would also do one threshold style workout, with longer sustained intervals once a week, or every 10 days. Everything else would be long and easy.
Come September/October, I’d look to be more specific with my movements. Maybe dust off the roller skis and start to do more work with poles. I would also start to be a bit more structured with my training on a weekly basis. I would keep the long threshold intervals in there.
Throughout the summer I’d jump into a running race, bike race, or triathlon every 4-6 weeks for fun & to keep that top-end there. You could also do some personal challenges, like trying to set FKTs on local trails etc…
As far as what activity to choose, I would go with sports that you enjoy and that keep you the most active. Of course, I think trail running is great, but not everyone enjoys it as much as I do. I would definitely do sports that engage the legs, like biking, running, or hiking, over paddle sports, but even they can have their place.

Adam on a training run through the South Chilcotins area of British Columbia.
Q: During our exchange on Twitter last year you were advocating for year-round high-intensity efforts/intervals no matter for which group of athletes. Could you explain in more detail why both groups should regularly do those sessions? Or how often they should do them over the year?
I am somewhat opposed to that approach on grounds of injury prevention and my experience.
I do believe that every athlete benefits from some form of high intensity activity throughout the year, whether it’s in the weight room, on the bike, or running, it’s what best mimics the demands of racing.
That said, skimo is an aerobic sport, so the bulk of your training, the “meat & potatoes” should be aerobic training. The high intensity work can come from doing long uphill efforts; it doesn’t necessarily have to be structured interval work until later in the summer.

Adam catching his breath after some hard efforts in the winter.
I’m also becoming a bigger believer in shorter high intensity efforts, of 30 seconds or less every couple of weeks. I don’t know the science behind it, but I’ve been told that, especially for older athletes, it’s important to keep testosterone levels high, since we sort of numb our adrenal systems through endurance sport. I probably just butchered the physiology of that, but it makes a big difference to how my energy system feels.
I have a limited ability to stick to low heart rate training, I get burned out very quickly when I do.
I actually think intervals and high intensity training can be more beneficial to amateur athletes, since they have less time to train
I also find that a lot of amateur athletes, or people new to sport, have a lower ability to push themselves. I find intervals help teach people about pacing and where their limits are. I do not believe in doing intervals more than once a week, I even find a big benefit doing them every 2 weeks.
Once again though, I believe in doing some sort of threshold workout weekly, so more of a tempo type effort.
Q: Maybe this is redundant considering the above but: Can you give us an overview of your training about 8 months from your goal race? What do you focus on in each period?
I think I’ve sort of answered that. But in a big picture idea, I work back from my goal race. I find I can’t focus for much more than 10 weeks on one specific goal, so starting from my A race, I would work backwards in this order:
RACE DAY
10-12 weeks out – specific prep

  • Mimic the course in training
  • Work on my gear & dial in the technical aspects
  • higher intensity intervals
  • longer hard outings

12-20 weeks out

  • race fitness
  • B races & work on weaknesses
  • technical aspects of the sport (i.e. gear, nutrition etc…)

20-24 weeks out

  • threshold style work
  • long easy sessions

24-32 weeks out

  • General fitness
  • Some C level fun races
  • Work on weakness

32+ weeks before

  • Rest & fun

Q: You don’t do any skimo races but you do ski tour a bit. What do you think about running or hiko-running with ski poles as a training tool for skimo people?
I think specificity is key, so doing work with poles makes a huge difference.
It’s also probably good for people who aren’t used to the pounding of running, so can offer a bit of relief from the strains of running, it’s a very efficient way of travelling through the mountains, especially if you’re used to them, so I would absolutely advocate using them in training.

Progress and learning

I am very happy Adam was keen to do this interview as his answers clarified all misunderstandings we had last year on Twitter. Now, I believe we are actually very similar in our approach to training.
The most important thing though that I learnt from this interview and will be including in my training much more often are the short high intensity bursts. This should help me improve some of my weaknesses.
What have you learnt or do similarly, or differently?

Filed Under: People (Interviews), Skimo Racing, Training, Tricks & Tips Tagged With: Adam Campbell, Arc'teryx, mountain running, Salomon

Measuring skimo racing success: Focus on small goals rather than results

March 13, 2013 By Stano Faban 1 Comment

Obviously, when we race we care about results. By results, I mean our name’s location on a sheet of paper which determines our state of satisfaction after each event. Or at least that’s how my relationship was with results before I knew better.

Forget the results

For sure I still care about the results, however, I read them differently now. It’s not the most important thing to me despite it giving a very quantitative value of my performance.
Why?
Because results are a statistic. They are raw data and nothing more. And I now find it very misleading to judge something so complex as athletic performance without considering broader context.

Focus on small specific goals

To measure your racing success or satisfaction more properly have three small goals for each race. At the end, put more weight on those than the result.
Here is an example of what kind of small goals you can set for yourself. Try to be quite specific, not general:check-boxes

  • Nailing all skins-on transitions (instead of “nailing all transitions”)
  • Ski the long technical descent smoothly and under control (instead of “ski fast”)
  • Don’t slip on the moguls climb (instead of “climb strong”)
  • Eat a gel after 50 min (rather than “eat two gels”)
  • Layer up and do a 15 min cool down right after finishing (rather than “do a cool down”)

Why only three goals?
Your racing mind will function much better if there is less to think about. And once you accomplish the goal in one race you will replace it with another small one in the next.
Why specific small goals?
The goal size and specificity allows you to focus on the it better because you know with absolute certainty what needs to be done to accomplish it. Also, it let’s you evaluate whether you nailed it or not much more easily than trying to figure out whether you skied fast or not.

Long time improvement

Once you come into peace with the idea that the end result is not as important you are setting up yourself for a long-term improvement. Results only by themselves are a double-edge sword, without reflecting the bigger picture.
And yes, it is true that for lot’s of these goals there won’t be an objective measure but that’s not a problem. You know very well whether you can check off a specific goal based on how you feel about executing it. If you don’t answer that honestly you are only cheating yourself. No progress.

Your next race

Figure out three specific things you want to improve at. Create a sequence of them for your next race. Now go and do your best to check them off.
What do you think, is this gonna work for you?
Share your thoughts in the comments below.

Filed Under: Racing 101, Training, Tricks & Tips

10 Quick Tips to Improve Your Skimo Racing

January 18, 2013 By Stano Faban 1 Comment

Uphill tips:

  1. Relax your shoulders, neck and face… or as much muscles as you can. Save your energy.
  2. Experiment with variety of strides on variety of angles.
  3. Good kick-turns technique allows for short moments of recovery. They add up.
  4. Have spare skins always handy, not in your backpack, at least one.
  5. If you estimate a race will take you more than 2h do not skip on fueling. Unless you feel like God that day.

Downhill tips:

  1. It doesn’t have to look pretty, just fast.
  2. Longer traverses between turns allow for more rest.
  3. Don’t just blindly follow racers in front of you. They might be skiing off course… and you with them.
  4. If you think you skied off the course immediately start traversing the slope in both directions and look for flags below as well as above.
  5. There is no shame in using a snow plow to get things done occasionally. After all, it is ski mountaineer’s best friend.

Bonus tip:

Some lessons need to be gained through personal experience; otherwise, they are highly underestimated 😉

Filed Under: Skimo Racing, Training, Tricks & Tips

How to minimize effects of altitude on skimo racing performance – Tips for acclimatization for competition at altitude

December 21, 2012 By Stano Faban 3 Comments

When we sling on our pack for a ski traverse or strap down our boots for a ski mountaineering race we rarely think about the effect altitude will have on our body and our performance.
Altitude is a concern for Himalayan expeditions not for running around our home peaks, right?
Wrong! The International Olympic Committee (IOC) designates “Moderate Altitude” as between 1700 and 2900 metres above sea level.
Whether you are doing a multi-day traverse expedition or a two-hour skimo race, the altitude will affect you. The effect varies and can be minimized with proper education and preparation.

Usual skimo race elevations

Skimo races in the US and Canadian Rockies are routinely held between 1700 and 3000 metres (5500-10,000 feet) with some reaching as high as 3500m (11,500ft).
Specifically, the course of the American Skimo Championships in Jackson Hole, WY is between 2000 and 3200 metres (6500-10,500 feet). And Colorado races have their start lines already above 2700m (8900ft)!
For the Canadian Skimo Champs in Golden, BC the course travels between 1800 and 2600 metres (5900-8500 feet).

Jackson Hole ski mountaineering race 2012
Even though the sign at the back says “slow” the start at the US National Skimo Championships each year is especially vicious. Combine this with Jackson’s Hole course profile, between 6,311 and 10,450 feet (1924 – 3185m), and your body is going to overdrive if you are not used to the elevation.
» Photo credit goes to Mark Gocke and here you can see his full 2012 Jackson race photo gallery.

How does altitude affect our bodies?

With exposure to moderate altitude, our breathing rate increases, partially making up for lower oxygen availability.
Short-term exposure (hours to days) also causes loss of body water and sodium through increased urination. Decreases in body water lead to decreases in plasma volume (the fluid component of blood), which can potentially impair performance.
The altitude also affects your heart and lungs; impaired oxygen delivery to the muscles results in a 7% decrease in aerobic capacity (VO2max) for every 1000 metres above sea level (a relationship that is nearly linear; even at low altitude, we see a decrease).
Aerobic capacity is closely related to endurance performance. This decrement improves with a long-term stay at altitude but never completely recovers to sea-level values. One study at 2300 metres showed an initial 13% decrease in VO2max improving to only a 6% decrease after 14 days.
At altitude, our muscles also communicate fatigue differently. An athlete will self-select a slower speed than they would at sea level. It is possible that this is related to an increase in lactic acid production.
Lactic acid is produced as a byproduct in our working muscles and its accumulation during exercise is generally accepted as a factor leading to fatigue. Higher levels of lactic acid could mean earlier onset of fatigue compared to sea level.
During the night, waking up more than usual might easily be attributed to (or overshadowed by) pre-competition jitters, but research shows that sleep can be affected even by moderate altitude.
The first few nights at altitude might be marked by poor sleep. At higher altitude, this becomes more pronounced where breathing slows gradually until it stops altogether (called Cheyne-Stokes breathing). After a moment, you wake with a start, gasping as if you just crested the top of a steep bootpack.

How to minimize the “altitude effect”?

We can mitigate the effects of altitude prior to competition or a trip by using a few simple strategies:
It is advisable to allow for a 4-6 day acclimatization gap between travelling and competition. This allows your body to recover from some of the acute changes at altitude while hopefully not interrupting necessary pre-competition training too much.
Travel to altitude well rested, therefore, giving your body a chance to adapt as much as possible.
Training in the first few days at altitude should be restricted to low-intensity and minimal volume. This allows your body to recover from the combined stress of training and altitude.
A proper hydration strategy is important to combat water loss while maintaining a proper fluid and electrolyte balance.
The final component of competition at altitude for an athlete to be aware of is illness. Three main altitude illnesses are:

  • acute mountain sickness (AMS),
  • high altitude pulmonary edema (HAPE),
  • high altitude cerebral edema (HACE).

At moderate altitude, it is unlikely anyone will experience HAPE or HACE – life-threatening accumulation of fluid in the lungs or brain.
It is possible that AMS could develop, especially after a quick ascent to the venue. Symptoms to watch out for include: headache, nausea, fatigue or weakness, lightheadedness or dizziness, and poor sleep.
While some of these symptoms may be difficult to differentiate from travel/jetlag or from hard training, grouped together, they may signal the onset of AMS and descent to a lower altitude should be considered.
Touring, training, and competition at moderate altitude are unavoidable for even a novice ski mountaineer. All those who participate in these activities should be aware of the acute affects of altitude and should take the necessary precautions to avoid altitude illness.

Summary – key points:

  • Many competitions take place at moderate altitude (1700-3000m or 5500-10,000ft)
  • Moderate altitude impairs performance through a variety of mechanisms
  • Mitigate the effect of altitude by:
    • travelling to competition venues 4-6 days early
    • ensuring adequate fluid and electrolyte levels
    • being well rested
  • Watch for signs of altitude illness

Filed Under: Skimo Racing, Training, Tricks & Tips

Hiko-run: Skimo racer’s best summer friend

August 20, 2012 By Stano Faban 3 Comments

In the previous article on rando skimo racing summer training I talked about “bread and butter” – the benefits and importance of endurance base building during the summer months for ski mountaineers that absolutely want to improve their performance once the country turns white.
hiko-run explainedHere, I am going to discuss a workout that tremendously helps with building your endurance base while making you practice almost the same movement as on skis by working the same muscles as used during skinning.
I have been using this type of a training session long time ago but only years later I started to fully appreciate how many benefits are packed into it, and it’s not all only about your lungs.

What is a hiko-run?

The term “hiko-run” is made up. I never heard it before I and a couple of friends came up with it. But it’s possible other people use it as well.
The need for such a term came from not being able to describe “a run that also featured walking parts” – our training diary was asking for something simpler.

Why you should hiko-run

Our small training group (back then I was a triathlete) never intended a running session to have walking segments but when, for training variety reasons, we wanted to run trails with long climbs while still remaining at low intensity (base building) we had to switch to a walk, or a hike mode.
In order to stay aerobic [Wikipedia link] on the lower spectrum of exercising heart-rate intensity for long periods of time our coach wouldn’t let us run over the hills. And so the “hiko-run” became a new term and a training tool.
You might be asking why one wouldn’t want to keep running even over small hills, no longer than 2-3min?
Well, even such a small hill can take you from low aerobic endurance intensity up to somewhere below your anaerobic threshold [Wikipedia link]. See also anaerobic exercise on Wikipedia for more details.
Now you maybe ask “why is this not desirable?”
Let’s say there were 10 such hills during your run and you sort of powered over them. With that you almost completely changed the goals/effects of that training session. I am not saying you should never run over the hills, I am saying that you should be quite mindful during every session to achieve desired training effects in the long term.
You can keep running over these hills right from June or July if you simply want to, however, you will be doing something that would have greater benefit on your performance if you introduced it few months after you built up a solid low intensity endurance base.
For the sake of simplicity I am going to stop discussing the physiology whys and whens right here as it might confuse less experienced ones. If I answer another why then I would have to answer many more whys and whens to fully explain this 😉 but feel free to ask in the comments below or email me.

Hiko-run with ski poles

Apart from a great exercise this session usually means beautiful trails and views as it is basically hiking with poles with a slightly longer stride.

How to do it properly:

Pick an objective (a mountain) with enough vertical gain that will have you climbing for at least 30min, doesn’t have to be very steep. I do anywhere from 40min to 2-3h. All depends on terrain available, your fitness, and goals.
Throughout the whole session try to stay in the endurance base building intensity – more or less being able to carry a conversation:

  • On steep parts ease off the pace to compensate for the more challenging terrain thus keeping the intensity low.
  • On flats, if it’s getting too easy, switch to jogging without using your poles – grab them in the middle for more comfort.
  • All you are trying is just to maintain a low but constant intensity.

Experiment with frequency and length of your stride and because you will have poles you should use them to push off like when skinning thus getting a slightly longer stride. And remember to use hand straps.
To allow for a full arm extension your poles will need to be about 5-10cm shorter than what you use for touring or skimo racing.
>> See this article to figure out the best length for your skimo racing poles.

Benefits:

The main benefit to me is the relaxing energy of nature, and that you can do it with slower friends as the goal of the workout doesn’t require you to hammer away, or to unconditionally focus only on yourself.
Physiological benefits are:

  • Endurance base building – increased aerobic capacity
  • Increased leg strength because of the vertical gain
  • Refreshing your muscle memory with skimo specific workout yet not requiring snow
  • Downhills train your quads for non-stop skimo descents…or pool parties 😉

Hiko-run without poles

Hiko-run without poles is pretty self-explanatory but there are some differences compared to the pole version. Mainly, there is more running than hiking. I guess it could be coined then as a “runo-hike” 😉
This version can be used as a starting point if you don’t feel strong enough to sustain long climbing yet, or simply as a variation in your training whenever throughout the year – that’s how I use it.

How to do it properly:

Choose a trail/course that has some small hills. Adjust the vertical gain and length as desired. I do anywhere from 40min, when pressed for time, all the way up to 3h of total climbing time.
Again, during the whole session try to stay in the endurance base building intensity – on the hills ease off the pace to keep the intensity low. Since the vertical gain isn’t very much you should be able to run the flats while staying at low intensity. Downhills are up to you, I usually jog them but sometimes switch to walking if my legs feel too sore.
Stride length and frequency is very individual and I would advise to consult some experienced runners on this. My general advice would be, rather keep the frequency higher and stride shorter than the other way around. But mainly, just run and don’t worry much.

Benefits:

The main benefit is that you can quite comfortably cover lots of ground fast yet not be as sore the next day as if you run it. And the base building benefit is still there.
Physiological benefits are:

  • Endurance base building – increased aerobic capacity
  • Leg strength improvements are smaller but that is not the goal of this session anyways
  • Your stride frequency is faster than when on skis (hiko-running with poles) which sets you up for a faster turnover once going into the winter

Hiko-run as a year round training tool

I believe it is beneficial to keep hiko-running or simply running even in the winter:

  • Firstly, to break the training stereotype but
  • more importantly, to exercise at a fast stride frequency (cadence/turnover) that could be maintained on skis only with very taxing high  intensity intervals.

Sometimes I don’t run for couple of weeks during the winter because simply there is too much snow everywhere except paved roads, which I don’t like. However, when I get a chance to squeeze in a run even once in 10 days I can feel that my legs sort of “correct their timing” a bit.

Any questions?

If you found this article helpful tweet it, or share it with friends that can learn from it.
And feel free to ask anything in the comments below.

Filed Under: Skimo Racing, Training, Tricks & Tips

"Bread and butter" summer training for rando racing and speedier ski mountaineering: Endurance and Activity variety

July 30, 2012 By Stano Faban 1 Comment

I would never believe that my first thought would be about training when waking up today, then closely followed by thoughts exclusively only about bread and butter. Perhaps because I was waking up after a successful Iron Maiden show. Then somehow the brain quickly connected the two and here we go 😉
Ski mountaineer's summer.An old cycling wisdom says: “Tour de France is won in the winter!” It’s an interesting statement since the Tour is ridden in the heat of July.
It means that if you are not building your endurance engine sufficiently  long time before your goal event then you will have trouble reaching your potential that year, and consistently improving over long periods of time.
So what does this mean in rando racing and ski mountaineering terms?
Feel free to let me know in comments below if you want me to expand on any concepts introduced here. I am keeping this article simple for everyone to understand as too much detail can be overwhelming and difficult to act upon.

Endurance capacity should be your “bread and butter” in the summer

Basic principle:

All endurance performances (sports lasting longer than 2-3 minutes) are the most effectively improved (long term) via consistently improving ones endurance capacity (low heart-rate intensity).
The biggest reason for this is that improvements to your more intensive (higher heart-rate) capacities rely heavily on your low intensity endurance base. Simply, if you stop improving your body’s efficiency at low intensities you will have very hard time improving its efficiency (thus speed) at high intensities, also known as around and above lactate threshold.

What to do:

If you are planning to do (or improve upon from last year) couple of rando races in February and March  then July, August, September should serve you as your base endurance building months.
Personally, during this time I don’t follow any structured training plan. All I think about is “bread and butter” – I don’t worry about speed or sports specific workouts during this period because the single most important thing is building a big endurance base.
This “bread and butter” theory also allows for easier prioritization. Let’s say you want to improve in the winter and have time for 14 endurance sessions and 6 bouldering or fishing trips during August. If you miss 2 MTB rides because of bad weather by mid-August then without deep analysis you will know that you should replace 2 bouldering sessions in favour of 2 endurance building activities in the next 2-3 weeks.
Note: I am not saying climbing is not more fun and that you should sacrifice your pleasures. I am simply stating what is “bread and butter” during this time of the year if you really like to improve 6 months down the road.

Intensity:

The intensity could be easily measured with a heart rate monitor or jugged by your breathing comfort level – you should be able to talk fairly easily at any moment.

Activities: variety, agility and injury prevention

I strongly believe endurance base should be built through a variety of activities during this period of the year, and that summer is the best time to improve your agility.

Variety:

Variety is important as it allows your body to relax certain muscle groups while engaging new ones, and it is way more fun to alternate sports from day to day than just running all the time.
Also, 6-8 months from your goal you can afford not to focus on repeating sport specific movements at all times. You won’t be any worse because of that as long as you remember to eat your “bread and butter” regularly.
The most successfully used and easily accessible endurance building summer activities for ski mountaineering are:

  • Running
  • MTB biking
  • Road riding
  • Hiking
  • Running or hiking with poles
  • Swimming

These are great because they let you control your exercise intensity easily.
MTB biking could be an exception here but it depends on the terrain you ride and your skill level. For me, MTB is a bit too demanding until later in the summer when I get the hang of it, which I never fully do though 😉
Great skimo athletes such as Kilian Jornet, Melanie Bernier, Sari Anderson, Luke Nelson (too many to name) are also very successful endurance athletes in MTB, road cycling, trail running, or adventure racing. Variety serves them well.

Agility:

Agility comes from variety but is more effectively developed through different summer activities than the above endurance sports:

  • Climbing / mountaineering / bouldering
  • Soccer
  • Tennis
  • Football
  • Balance challenging strength training

Basically, anything requiring good hand-eye (foot-eye) coordination and balance develops your agility. This will help you with technical skiing, mountaineering, transitions, and injury prevention.
Personally, I spend lots of time playing tennis and soccer between June and August. Then I usually keep only playing soccer until I start regularly skiing (late November).
I don’t do them because I want better agility, I do them because I love the skill, strategy and have lots of friends that are very good at those. But I do notice that if I miss a summer doing them I kind of feel “off balance” once the sliding season starts.

What do you do in the summer?

Absolutely feel obligated to ask or comment below since you got all the way here.
Are there any activities you would recommend to try to accomplish the above goals of summer months?
And a tweet won’t be out of place either if you learned something new. Thank you.

Filed Under: Skimo Racing, Training, Tricks & Tips Tagged With: Kilian Jornet, Luke Nelson, Melanie Bernier, Sari Anderson, summer rando skimo racing training

Rando ski mountaineering (racing) transitions with Reiner Thoni

December 1, 2011 By Stano Faban 9 Comments

Ski mountaineering is as much about having fun as it is about efficiency. In fact, the more efficient you are the more time you can spend having fun. Hunting powder in the backcountry or during a skimo race lots of time can be saved on transitions – getting you set from uphill to downhill modes and the other way around.
There are couple of styles for wicked fast transitions and no style is really too much faster than the other – it all boils down to pick your style and practice it again and again. In the two videos below, Reiner Thoni (current Canadian and North American skimo racing champion) will talk you through his way of transitions.
There are separate articles about different rando ski mountaineering transitions coming on Skintrack – with more in depth analysis and videos from the last World Ski Mountaineering Championships 2011 in Italy.

Reiner’s skins off transition


It may seem that this transition is only possible with skimo race gear but in fact many of us are doing it the same way with any Dynafit style bindings. Of course, the boots might have more buckles or the skins might need to be ripped off from the back but otherwise the workflow is the same.

Reiner’s skins on transition


What was said below the “skins off” video applies for this transition as well. The same logic can be applied with non-racing gear but might require some additional steps – undo buckle 1, buckle 2, buckle 3… 😉

Small differences, and personal preferences

Since there are more ways of doing the fastest transitions differences occur mostly with personal preference. As you can see in “skins on” video, Reiner likes to bring up the whole ski to finish putting the skin on. Many of us do that with back end/toe of the ski being firm on the ground the whole time which I consider an advantage in crowded European race transitions where every inch is shared or has to be fought for.

What are your thoughts? Maybe you want your transition analyzed?

You are welcome to ask questions or share your advice through the comments below.
Also, if you want your transition analyzed I can help you two ways – meet you at a race or you can upload your video to a site like YouTube and send me the link. (If you can’t or don’t know how to upload to any video sharing site just drop me a line below and we’ll figure something out.)

Filed Under: Racing 101, Training, Tricks & Tips Tagged With: Reiner Thoni

6 tips to get you ready for your first ski mountaineering race

November 23, 2009 By Stano Faban 12 Comments

Backcountry skiing is great fun. It is one of the best ways to spend time with your friends, to relax and to do what makes you happy. But from time to time we all like to try something different, to have a new challenge.
crystal-race-bootpack-2007You can challenge yourself many ways. For me, ski mountaineering racing is one of the ways I like to challenge myself during winter months.
Skimo racing makes my life more interesting in couple of ways:

  • Gives me an athletic goal, which I always like to have.
  • Teaches me efficiency, which helps with equipment skills.
  • Forces me to reach for my limits, which helps in moving them.
  • Makes me participate in a community that by definition is very friendly.
  • Introduces me to one of the nicest people I have ever known.

Whether you feel like trying something new or just wanting to improve in your next race here is a list of tips I consider essential (and in that order) to get the best out of your experience:

  1. Gear – check what you have and act accordingly
  2. Conditioning – your overall fitness
  3. Technique – practice the right moves
  4. Fuel and rest – quality makes or breaks your days
  5. Transitions – gaini time for free
  6. Speed – the icing on the cake

Gear – check what you have and act accordingly

I am starting with gear because without it we cannot backcountry ski. But since it is a whole another topic I am not going into much detail here.
I assume that you have either AT gear, telemark ski gear or a split-board for touring. The level of the gear (high-end, cheap, light, heavy…) doesn’t really matter if there is a will to try new things.
You don’t have to run into the store right away but a fact is that AT gear is the most efficient for skimo racing. You can learn about this from a personal experience of a current Canada Skimo Team member here – From tele to Team Canada: A telemark skier’s switch to AT race gear.
As with anything that involves going uphill lighter is better because it means faster climbing. And skinning up is the majority of the time spent when skimo racing (just like touring).
Besides that you should make sure your skis are in good condition, that your bindings work as they should, or that your ski poles ain’t going to collapse on you.
Simply check all your gear at least couple of days before a race and make necessary repairs or replacements.

Conditioning – your overall fitness

For skimo racing you don’t have to be super fit. Of course, the fitter you are the easier it feels but you don’t have to be able tour 5000 feet days in order to race. There are usually two categories at any event and you can sign up for the one you feel like doing.
The key with conditioning for ski mountaineering racing is to be active. You don’t have to be active racing or speed wise, just be used to spending time outdoors doing things you like – climbing, biking, hiking…
And just because you are getting ready for a race don’t panic about speed or interval training. Speed is only the icing on the cake. To get to a point where you should worry about speed training you need good overall conditioning.
So be consistent with your sport activities for at least couple of weeks before you even think about pushing the pace.
As strange as it sounds, you need to go slow in order to go fast. Everything that is very beneficial for health or racing purposes that happens in your body is a product of low paced activities (or workouts). The amounts of slow paced activities will determine your progress from year to year way more that any interval workouts.

Technique – practice the right moves

Even though good technique is very important for skimo racing, it will not save you if your basic conditioning is poor. Also, your gear will determine your technique efficiency as well.
Climbing
Since the most time during ski mountaineering races is spent skinning up you should focus on developing an efficient stride. Don’t force yourself for the longest stride. Rather try to pick your frequency which some times means shortening your stride if your original one is too long.
Make sure to practice skinning on hard snow, up steep uphills and traversing.
One of the most important climbing skills for skimo racing are making efficient switch backs. There are switch backs sections on many race courses. On those you can loose minutes and lots of energy if you are struggling due to your technique. On the other hand you can effortlessly drop less skilled racers even if you are not as fit as they are.
Downhill
Skiing with seized up legs and burning lungs is hard and some times dangerous but fun. The key for solid downhills is to practice skiing right after you climb a hill and rip your skins off. You need to get used to wobbly legs if you want to ski without stopping in races.
To make the skiing less taxing on your legs practice doing turns with big radius (20+ meters) rather than short and aggressive. Use “traversing sections” between turns to control your speed as oppose to pushing on your edges with your quads. On a 2-3min downhill the difference is only about 10sec but the energy spending is over the roof compared to a more mellow style.

Fuel and rest – quality makes or breaks your days

We all read many times one of these: “you are what you eat” or “your body works only as good as the fuel you put in it”. Of course, there are individuals that defy this. Heck, even I had some great races after downing few beers and eating a big sausage a day before an event 😉
The point is that your eating habits and the quality of food you consume greatly determines your short term as well as your long term body functioning. The same goes for rest. You can find plenty of advice in sport and health nutrition books.
No meat
Based on my experience, for skimo racing, I will recommend not to eat meat starting the day before the race. Few slices of ham on a sandwich are OK but a steak is not very useful.
Dinner
The night before the race have simple dinner – some veggies and lots of pasta or rice. Veggies will give you some variety in taste and pasta or rice will load your body with the desirable carbohydrates.
Race fuel
During the race drink a sports drink rather than just plain water, and you can consume an energy bar or a gel if you feel you are running low on your reserves.
Sleep
If you are not getting enough sleep on regular basis, try to get in at least three 8h nights before your race. No engine is good if your brain is tired.

Transitions – gain time for free

Transitions between uphill and downhill modes (and vice versa) are parts of skimo races where you can gain lots of free time. If you are more efficient with your gear than a guy next to you, you will consistently drop him at every transition and he will be expanding lots of energy trying to catch up to you.
If not sure about your technique ask more experienced/skilled skimo skiers what works for them. Try it out and if it seems alright practice the moves. Once at the race you can observe the fastest racers how they transition in few seconds.
To give you something to shoot for I am going to give you some average times for transitions:

  • Fairly efficient racer with no special AT racing gear needs about 1.5-2 min to go from uphill mode to be skiing ready. And it takes him about 2-3 min to put his skins on, and adjust his boots and bindings before he can march uphill.
  • The fastest racers transition from climbing to skiing in about 20-30 sec, and are ready to hammer up after skiing in about 40-50 sec.

Technique, practice and gear makes the difference in transition areas.

Speed – the icing on the cake

Speed factor is last on this list because I don’t feel it is a necessary element to have a blast at your first race but we can discuss it a bit.

peter-kilian
World class ski mountaineering athletes train smart and a lot, yet even they spend majority of their training at low paced intensities.
Your downhill times are mostly determined by your technique but climbing speed is mostly determined by your conditioning.
Climbing like a mountain goat is desired but not the most important thing at this stage.
However, if you really want to challenge for skimo podiums then you will need to put in some real hurting miles.
You need to teach your brain and body to push more for longer. This is achieved either by simply hammering every hill in your way or by very specific workouts.
Hammering based only on your gut feelings can take you only part of the way. Usually, it has a faster effect than the more “scientific” approach but is short-term lived as it is a very inefficient training method. And if practiced over long time with high frequency you are headed for injuries and illnesses.
For serious speed (fast) training talk to an experienced athlete or a coach and read some books from reputable people. Also, you need to understand that speed training without great overall fitness has very low success rate as you will never reach your full potential.

How are you going to challenge yourself this winter?

So are you going to challenge yourself differently this winter than your usual weekend powder hunting?
I challenge you to make your first race the Tiki Torch Dash in Golden on Dec 6. It is specifically made for those that just want a little taste of skimo racing. Nothing too hard, mostly a fun event where you can learn some tricks and meet new friends.
Ask, share and discuss in the comments below.

Filed Under: Racing 101, Training, Tricks & Tips

Buying altimeter watch that fits your needs and budget

November 13, 2009 By Stano Faban 9 Comments

Choosing which altimeter watch to buy is tough with the variety we are presented today, so let’s make it simpler with some basic advice that will help you decide.
altimeter-watches-mainThis article is an extension of “Altimeter watch: Why it is important and beneficial to know your altitude?“. It is a recommended read for those that are unsure whether they need an altimeter watch or not.
Altimeter watches come in all shapes and sizes, and their features can vary greatly. Some don’t let you record your trips while others combine altimeter functionality with a heart rate monitor.

Making decisions – factors to consider

Two factors you need to really consider are your needs and your budget. The lower your needs and preferences are the less money you will need to spend and vice versa.
To beging the process make a list of your “watch needs”. What you want the watch to use for? What features should it have?
Here are some hints to get your needs list started:

  • need to know only my immediate altitude
  • want to record my trip/hike vertical profiles (logbook)
  • want to know how many laps I skied today
  • need to download data from the watch to computer
  • and so on…

I use and suggest these functions with an altimeter watch:

  • obvious – time, stopwatch, thermometer, alarm, immediate altitude
  • vertical speed – shows your actual vertical speed you are traveling at; once you start following it you will find many uses for it – here is more on vertical climbing speed topic
  • logbook – lets you record your trip/hike/workout including couple of parameters, mainly total vertical meters gained/lost
  • chronograph – almost the same as logbook but more useful for workouts with heart rate monitor

Once you know your needs you can start looking for the solutions – different altimeter watches.
Note: One thing here though is that you may not come up with a certain need in your list because you simply don’t even know a watch can have such features. Therefore, you might adjust (expand on) your needs as you are already browsing different models.

Define your budget – will save you time

Even though it is obvious you know your financial status it is good to predetermine your budget. Come up with a price range, it will help you narrow down your choices and save time comparing different models.
Again like with the needs list, this can be a little tricky if you are new to buying altimeter watch. You may simply not know what altimeter watches are going for.
Altimeter watch prices vary greatly due to different features, their brand name (recognition, prestige) and materials they are made of.
To get an idea, here two examples:

  1. Altimeter watch with titanium housing and leather straps are expensively priced mostly because they are very stylish for everyday wear and they are also very durable.
  2. Watch that has a heart rate monitor and shows only the immediate altitude but has no further altimeter functionality (i.e.: recording accumulated vertical gains) is going to be more affordable than its titanium brother.

Altimeter watches – various brands

As far as your brand preferences go you will have many options these days. But here we will take a look only at those brands that have proven over long time they are worth their price, whether low or high.
Suunto
Based on personal experience, Suunto is my favorite brand if the watch is primarily used as altimeter. Besides me, there are thousands of mountaineers swearing by Suunto.
Polar
Again based on personal experience, Polar is my favorite if heart rate monitor functionality is the most important. And again, millions of athletes swear by this brand too.
Timex
Everyone had a Timex watch at some point in their life. How was it? Mine was great. Unfortunately, I don’t know anyone who has a Timex watch with an altimeter but the brand is definitely strong.
Other popular and casual brands
Then there are other brands that offer altimeter functionality in their watches as well but don’t have as much history with it: Casio, Highgear, Nixon, Freestyle USA and more…

Altimeter watches – introducing 6 models

Now that you have considered your needs and defined your budget let’s look at some actual altimeter watch models:

suunto-vector
Suunto Vector
» Essentials
Price: about $200
Various styles: yes
Available at: Backcountry.com, Altrec.com

The name “Suunto Vector” is a legend among altimeters and it was the first altimeter watch I ever saw. I believe, Suunto improved it since then yet they are still keeping it at a very affordable price. This watch has scored many awards and has been used by millions of people that go further than a stroll around a lake. Most recently, Suunto added a new model to the Vector family – Suunto Vector HR – that includes a heart rate monitor.

suunto-observer
Suunto Observer
» Skier specific
Price: $300-500
Various styles: yes
Available at: Backcountry.com, Altrec.com

I believe this was one of the first watches that was rated “for skiers” because the logbook was recording your day/trip and at the end you could see how many laps you skied. There are about four different styling options for it, however, not many stores carry more than two. Backcountry.com does.

suunto-x6-hr
Suunto X6HR
» With heart rate
Price: about $450
Various styles: yes
Available at: Backcountry.com, Altrec.com

I am using this is a watch past two years. (Before it was Polar.) I like everything about it except that heart rate monitoring is not as flawless as with Polar. Vertical speed, logbook functions and stopwatch recording are great. It connects to PC but the software is not as user friendly as Polar’s.

polar-RS800G3
Polar RS800G3
» Heart rate & GPS enabled
Price: about $470
Various styles: no
Available at: Backcountry.com

Polar is mostly know for their high quality heart rate monitors. My personal experiences support that 100%. This watch has basic altimeter functionality but great heart rate monitor features. It also shows your speed and tracks your distance via GPS. Polar comes from Finland, same as Suunto. And it connects to your computer.

suunto-lumi
Suunto Lumi
» Women’s casual
Price: $300-350
Various styles: yes
Available at: Backcountry.com, REI.com

This is as interesting watch because the styling doesn’t say anything about what’s inside. The Lumi looks to look cool at any situation and it must be. It has an altimeter, barometer and compass. Also, it speaks four languages: English, Spanish, German and French.

suunto-x-lander
Suunto X-Lander
» Casual & stylish
Price: $300-350
Various styles: yes
Available at: Backcountry.com

Suunto X-Lander is a great watch for anyone who is active outdoors but some times needs to head to a meeting right from the mountains. It has all essential altimeter functionality but with leather straps and aluminum body styling looks very “official”.

At different stores you will find different types/options/colors for different models, therefore you should check out more than one store:

  • At Backcountry.com you have the biggest selection of altimeter watches online (brand, models and options) and you can easily compare 2, 3, even 4 watches side by side.
  • At Altrec.com you will find less selection and different pricing than Backcountry.com.
  • REI.com doesn’t offer too many choices for altimeter watches, but does for other multi-functional watches.
  • MEC.ca offers about 10 different models.

Any questions re: altimeter watches?

If you have any questions or just want to leave a comment about this article or altimeter watches you can do so in the comments below.

Filed Under: Gear, Tech & Food, Training, Tricks & Tips Tagged With: altimeter watch, Polar, Suunto, vertical speed

  • « Previous Page
  • Page 1
  • Page 2
  • Page 3
  • Page 4
  • Page 5
  • Next Page »

Primary Sidebar

  • Facebook
  • Instagram
  • YouTube
Our Facebook Page

skimo-manual-banner-300px
 

Recent Articles

  • Kilian Jornet Interview: About His New Foundation, His Own Environmental Impact, and How He Wants To Help Athletes and The Outdoor Industry To Protect Nature
  • How Fast Are Glaciers Really Melting? How Will This Affect Your Mountain Adventures? Interview with Pascal Egli
  • Book Review – Art of Freedom: The Life and Climbs of Voytek Kurtyka
  • Forest Skis: Innovative, Custom Build, For Backcountry Skiing and Freeride
  • Lighter and Completely Redesigned: New CAMP Ultralight Ski Mountaineering Ice Axes

Categories

  • Contests & Giveaways
  • Crazy Tracks
  • Events & Races
  • Gear, Tech & Food
  • General News & Articles
  • Industry Press Releases
  • Movies & Books
  • News Shorts
  • People (Interviews)
  • Racing 101
  • Reports & Results
  • Reviews
  • Skimo Racing
  • Training, Tricks & Tips
  • Trip Reports & Conditions

Footer

About SkinTrack

Travelling through snowy mountains on skis is like flying… and experiencing life at its core.

Gear reviews, interviews, adventures, contests, skills, skimo training, race reports – we connect you to all things related to self-propelled skiing.

SkinTrack.com, created by Stano Faban, was born out of passion for ski mountaineering and ski touring. Over the years, it has become one of the most popular ski mountaineering blogs in North America.

Recent Articles

  • Kilian Jornet Interview: About His New Foundation, His Own Environmental Impact, and How He Wants To Help Athletes and The Outdoor Industry To Protect Nature
  • How Fast Are Glaciers Really Melting? How Will This Affect Your Mountain Adventures? Interview with Pascal Egli
  • Book Review – Art of Freedom: The Life and Climbs of Voytek Kurtyka
  • Forest Skis: Innovative, Custom Build, For Backcountry Skiing and Freeride
  • Lighter and Completely Redesigned: New CAMP Ultralight Ski Mountaineering Ice Axes

Useful Links

Comparing the lightest: Skis | Boots | Bindings

Skimo Training: Training Plans | Videos

Stay in Touch

  • Facebook
  • Instagram
  • Twitter
  • YouTube

Copyright © 2026 SkinTrack.com. All rights reserved.