• Skip to primary navigation
  • Skip to content
  • Skip to primary sidebar
  • Skip to footer

SkinTrack

  • Lightest Gear
    • Skis
    • Boots
    • Bindings
    • Skins
    • Packs
  • Skimo Training
    • Training Plans + Skimo Manual
    • Transitions Videos
  • Facebook
  • Instagram

Reviews

Book Review – Art of Freedom: The Life and Climbs of Voytek Kurtyka

October 3, 2020 By Stano Faban Leave a Comment

In the age of social media and instant news, it is fascinating to read a life story of one of the best alpinists in history yet who rejected many invitations to famous events throughout his life.

Thanks for your invitation au jury du Piolets d’Or [the Oscar of the mountaineering world]. I am sorry I can’t take part in it…

I understand the world is suspended on a monstrous structure of wild competition and, consequently, of awards and distinction. But this structure is an enemy of true art…

I sincerely believe that climbing can elevate the climber to physical and mental well-being and to wisdom, but awards and distinction elevate the climber to vanity and egocentricity…”

The 70s and 80s were the golden era of conquests in the Himalayas. A pioneering Reinhold Messner was arguably the main protagonist and the famous figure.

Risking his life often yet never loosing a climbing partner, Voytek Kurtyka, a Polish alpinist, consistently chose style over fame or altitude of a mountain in a period that was marked by summit hunting.

Smuggling goods from India back to his home communist country was highly dangerous but it was a way that Kurtyka embraced to pay for his addiction to Himalayan expeditions.

So how do you write a biography of someone that is so private?

How do you connect deeply enough to portrait them accurately?

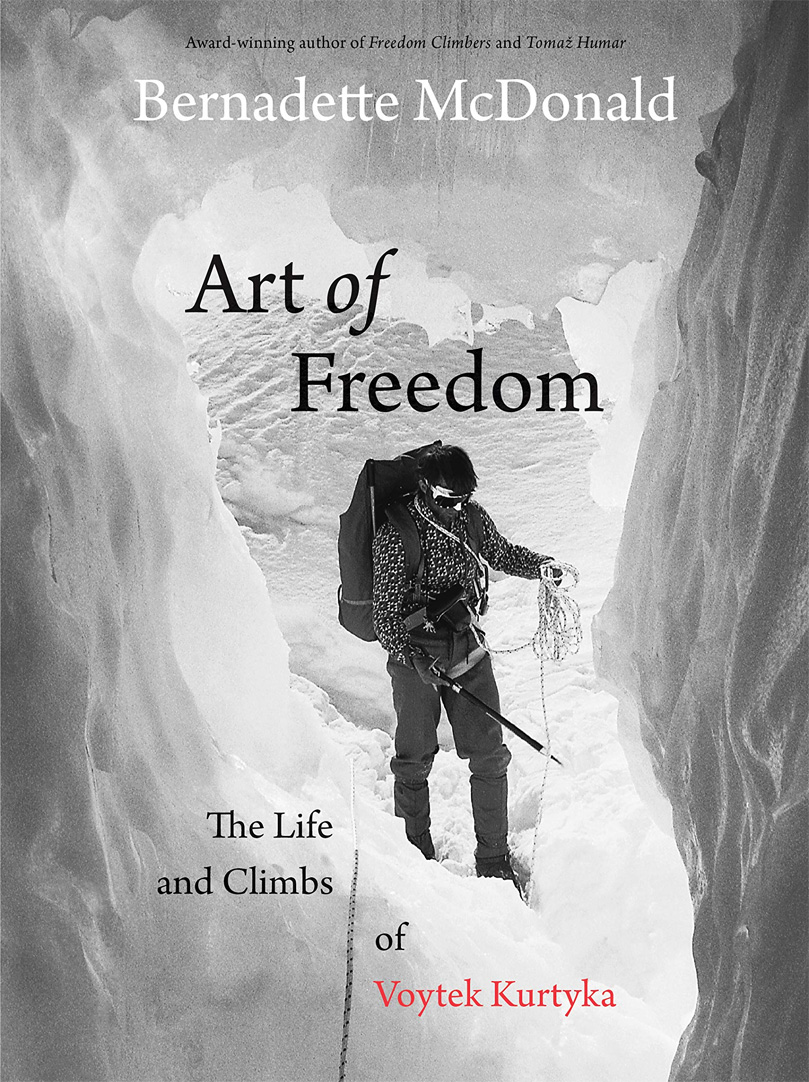
The book Art Of Freedom is a brilliant read that was penned by a Canadian author, Bernadette McDonald. McDonald has written previous books about the Eastern European climbers from communist era and so have built a trusting relationship with the elusive Polish climber.

This biography can be repetitive, with detailed descriptions of climbs, and perhaps too technical for those that don’t climb at all. However, I feel like this was the only way to reveal Kurtyka’s personality, philosophy and life.

Kurtyka and his compatriots came from a poor country with very small mountains yet they were able to innovate on the Himalayan scene by applying their hardness to crazy winter and first ascents. In fact, some of Kurtyka’s first ascents are still to be repeated.

The book also talks a lot about Jerzy Kukuczka, who was racing Messner to become the first person to climb all fourteen 8000m peaks, as he joined forces with Kurtyka for numerous amazing climbs. The two Polish climbers had contrasting philosophies and this allows the reader to go inside Kurtyka’s mind in depth.

Now, I won’t say anything more because I don’t want to rob you of an enriching experience this book can bring you.

Filed Under: People (Interviews), Reviews

Review of Ultimate Direction All Mountain Pack: Ski Touring Is Not Its Virtue Yet It Works Well

May 21, 2020 By Stano Faban Leave a Comment

Overview

Suitability: climbing and mountaineering rather than ski mountaineering and ski touring
Usual price: around $165 USD
Weight: 590g (size S/M)
Ice axe carry: 2 with quick access
Pros: light weight, durability, fit
Cons: lacks 1-2 separate pockets to be a better ski pack

Bottom Line

As an “all mountain” pack it works quite well for ski mountaineering and touring, however, it takes some time to adjust to its lack of dedicated pockets or compartments that we all like on specialized ski packs.

Review

Truth be told, this pack has never been designed as a true ski mountaineering or touring pack. It has been only my decision to push its limits as a ski pack because that’s my main passion, and I am on a search which single pack would “do it all” the best. You can read the packs full description on the UD website.

I have used the Ultimate Direction All Mountain pack for skiing for about 20 days in total over the last couple of months. It has been a “learning curve” the first few times out as the pack has only 1 big compartment and 1 very small pocket on the top lid.

I shuffled my gear inside a lot to find what works best because it was quickly obvious that transitions will take longer as things will kind of disappear inside.

However, after my “trial period” I came up with a pretty good system and started to appreciate the pack much more. Probably the feature I like the most on this Ultimate Direction pack is the easy access through its back panel that has a zipper all around. Without it I wouldn’t use it as often.

My best system relies on access via the back panel. Below the bottle and crampons there are wind/rain pants and first aid kit. Behind is the shovel bladed, and on the sides are shovel handle and a probe. The googles at the top are a bit squished while an insulation jacket is between the shovel blade and the bottle with crampons. The cheese seems to like this pack 🙂
Once you add skins, the pack is at its absolute volume limit.

This pack also comes with a removable, diagonal, quick ski carry system that is based on skimo race packs which is a great to have when your main activity is skiing.

The pack fits very well and feels secure at all times thanks to its simple hip-belt and two chest straps – I have been using only one as I like easy access to my jacket’s zipper.

The shoulder straps have a clean design while still providing some storage. The left one has a pocket for a flask or a small bottle – sometimes I use for my phone so its handy for photos. The right shoulder strap has water-proof, zippered pocket that will accommodate most smartphones – I usually use it for a knife, lip cream and few small items.

There are attachments for two ice axes that have quick-access buckles – meaning, that you can take an axe out without taking the pack off your back. This is a great feature, however, the bottom quick-access straps could use extra 1-2 cm (1/2 inch) slack as it’s little cumbersome to buckle in the ice axe shaft in place when the pack is fully stuffed.

Just reach back and press the grey buckle and you can easily pull out the ice axe in an instant.

So far, the pack is proving to have great durability. This is likely thanks to its construction simplicity and the use of Nylon ACE RIP fabric that is light yet strong.

The webbing on the outside of the pack is very useful for hanging extra gear.

The shortcomings of this pack for skiing, in my opinion, are its lack of compartments (or pockets) as these would make a life of a ski mountaineer much easier. Right now, all your gear plunges into one main compartment – shovel, probe, jacket, pants, food, water, first aid, googles:

  • At minimum, a dedicated zippered crampons pouch at the bottom would allow for more efficient gear organization, especially when you don’t bring crampons along. This pouch could have zippered roof so if you if need the one big compartment then you can easily create it.
  • Ideally, the pack would have another floating pouch at the top of its main compartment to store google, glasses, camera or sandwich so they can be protected by being always on top of all the other things.

What We Think Could Be Improved

As mentioned above, the lack of compartments hinder this pack to be much more suitable for ski mountaineering, without necessarily becoming worse for anything else, I believe.

Then using distinctive colours for the belts, or at least the buckles, would improve usability of this pack as one could quickly see where these elements are without much attention.

As my last point, I think the pack could have 2-3 litres of more capacity.

Filed Under: Reviews Tagged With: Ultimate Direction

Review of Julbo Montebianco Sunglasses: Ultimate Eye Protection on Snow

January 2, 2020 By Stano Faban Leave a Comment

julbo-montebianco-chameleon

Quick Overview:

Usual Retail Price: $100-200 depending on the lens
Weight: 33g
Lens we tested: Cameleon lens – category 2-4 photochromic polarized lens
Pros: the lens versatility, side panels, great contrast, anti-fogging, stylish
Cons: tighter fit for bigger faces

Bottom Line:

Julbo Montbianco sunglasses deliver great eye protection from sun and UV rays on snow and glaciers with the rare category 4 lens. Also, the lens’ ability to transition between category 2 and 4 make them very versatile for various mountain adventures in different weather conditions.

Product Description and How We Tested It:

I have been using the Montebianco sunnies for over a year – about 80 days in total – mainly for skiing, but also for hiking, climbing, mountaineering, and little bit of cycling and running.

Julbo is the “original” mountain sunglasses brand and one of the most recognized names in the outdoor industry. For a couple of decades now, Julbo has been manufacturing eye protection for mountaineering on snow and high altitudes – environments where the sun rays reflection compounds the damaging effects on our eyes.

julbo-montebianco-chameleon-1
Julbo has been specializing in transition lenses for long time and most of their other sunglasses go from category 1 (almost clear) to category 3 (comfortably dark) – these are mostly suitable for off-snow activities such as running, hiking or cycling. In total, there are 5 categories/filters to which sunglasses are categorized into, number five providing the most protection and being very dark.

The Montebianco model has been design for versatility, utility, style and most importantly to protect our eyes. This Julbo model transitions from category 2 (their default state) to category 4 in a matter of seconds when the UV rays are strong enough.

Once the lens is in category 4 mode it is very dark and allows you to comfortably stare into glaring snow whole day. In fact, the lenses has been the darkest I have ever worn.

The lenses also offer a superb contrast vision that is very appreciated during overcast days or in flat light while skiing unknown or through quickly changing terrain.

Some special coating on the insides of my lenses prevents them from fogging up. There were few moments when I needed to remove the glasses and went them out a little, but this happens often with many full-frame sport sunglasses, especially when it’s very hot and humid and you are not moving very fast (breaking trail on skis).

julbo-montebianco-chameleon-2
The “downside” of these category 4 transition lenses is that they don’t clear fast enough when I ski into the forest, or a very shaded area (under a cliff on a north slope for example). On few occasions, I had to remove them for short period, otherwise, everything was too dark.

Another cool feature are the removable side panels that protect eyes from UV rays coming from side angles which happens a lot in the mountains. They are great for winter and spring months. I don’t feel that the panels are needed in the summer unless I spend lots of time on a glacier.

Regarding the fit, like with any sunglasses, this is highly individual. These Montebianco glasses seem to fit well medium male faces. They fit great even when used with a helmet – mountaineering or a climbing one. For me, they feel slightly tight after few hours but I have a larger head.

The Montebianco frames are very durable but you want to be somewhat protective of the lenses to avoid scratches. This is not a sign of “less quality” but a small price to pay if you want to have lenses with so many different coatings that improve and protect your vision.

What We Think Could Be Improved:

There are many features that make the Montebianco model a great choice for your outdoor activities but of course, there are a couple of things that could be improved:

  • Adding some rubberized areas on the legs/stems would help holding the glasses on a ski toque while not in use.
  • It would be great if the transition from category 4 filter back to 3 or 2 if faster, however, I don’t know if this is technologically possible at the moment.

Filed Under: Reviews Tagged With: Julbo, sunglasses

Hagan Ultra 82 Skis Review: For True Ski Mountaineering And Challenging Conditions

December 13, 2019 By Stano Faban Leave a Comment

Overview

Suitability: ski mountaineering, steep skiing, spring ski touring
Usual price: around $750 USD at Hagan US
Weight: 1080g per ski in 164cm (117-82-102)
Tested length: 176cm (19m radius)
Pros: light for its ski performance, stability, edge hold
Cons: too much black colour?

Bottom Line

The Ultra 82 skis are fun to ski and an overall great performer. They are designed for true ski mountaineering with an intermediate to expert skier in mind. While some of its competitors might float better in 30cm+ of dry powder, these skis shine in challenging conditions – on hard packed or wind affected snow, in crust…

Review

We mounted our Hagan Ultra 82 with Plum Oazo bindings.

As the ski season in the Canadian Coast Mountains doesn’t want to take off this winter, I was not able to ski the Hagan Ultras in dry deep snow yet.

On the other hand, I spent enough days on them last spring in a variety of snow conditions. The biggest test was a 4-day Haute Route Imperiale ski traverse in Switzerland with a reasonably heavy pack and travelling through some big terrain.

The Hagan Ultra 82 skis have a 250mm front rocker which definitely helps in deeper snow but that’s not were they excel.

Being fairly stiff torsionally and with a more traditional camber than is perhaps usual for today’s touring skis, the Ultra 82s deliver when conditions are challenging and variable.

They are stable as they absorb most of the vibrations easily. They have a progressive stiff flex and provide really good edge grip. All this makes them nicely predictable.

Because they are on the stiffer side, I think it’s best to pair them with a stronger boot than Dynafit PDG or similar. Of course this also depends on your skill level.

I skied them with Dynafit TLT6 Perfomance boots (with boot tongues in) and it felt just right, but I can imagine skiing these with 3-4 buckle boots to really get the most out of the experience.

They are very responsive and fun to ski if you provide enough power. They handle higher speed, long radius turns very well if you can keep up with them.

The skis also feature a small tail rocker that seems to help with turns on hard packed an spring snow.

The core material is ultra light Paulownia wood with an overall construction consisting of carbon top and bottom layers. Diamond Edge Cap and Micro ABS Sidewalls provide the support for excellent edge hold.

Unless you are always skiing at least boot deep powder then the Ultra 82 skis might be all you need. Also, such width is great for any touring in the early season and spring.

What We Think Could Be Improved

Perhaps keeping the same stiffness but decreasing the camber height could improve the float while not compromising the Ultra 82 skis strengths? It might be a worthwhile experiment.

Filed Under: Reviews Tagged With: Hagan

Review of PLUM Oazo Ski Mountaineering Bindings: Versatile, Light and Durable

December 4, 2019 By Stano Faban Leave a Comment

Overview

Suitability: ski mountaineering, light & fast ski touring
Usual price: around $480 USD (Skimo.co, SkiUphill.ca)
Weight: 200g per ski
Pros: functionality, safety, low weight, 3-year warranty
Cons: no ski brakes (if you care for them)

Bottom Line

Without adding much weight, the Oazo is a well designed ski mountaineering binding if you want more safety, durability and comfort than with race bindings.

Review

We have used the Plum Oazo bindings for about 15 days of skiing in various snow conditions and terrain. So far it has performed very well and without any mechanical issues. We paired the Oazo with Hagan Ultra 82 skis which feels like a great combo for overall ski touring and ski mountaineering missions.

Plum is a French company based in the Chamonix Valley and the whole Oazo is manufactured right there. The binding has a 3-year manufacturers warranty.

To keep the weight down, Plum engineers decided to use a time proven toe piece from Plum’s lighter bindings (R150 and R170) and pair it with a new light heel but with more safety.

With three possible heel heights you can adjust the angle to your liking. While you do have to spin the heel to be in the flat position, once you are climbing you can use your ski pole to flip a riser to fine tune the angle.

One of the nicest features of the Oazo heel is that you can spin it both ways. This feels smooth but you will have to do it with your hand instead of a ski pole.

The heel has a fixed front (vertical) release at 8 but offers an adjustable side (lateral) release between DIN 4 and DIN 10, which is not usual at this weight category.

The women’s version, Oazo 6, is dedicated to women and a lightweight person. It offers a lower forward release of 6 but keeping the lateral adjustable release from DIN 4 to DIN 10.

For such a light weight binding, it can be adjusted for up to 20 mm in boot size difference, equivalent of 1.5-2 boot sizes depending on the manufacturer.

To round out the Oazo perks, the toe piece features an integrated ski crampons slot which worked well enough with our Dynafit crampons. However, you will get a smoother performance with Plum’s own ski crampons.

The materials used on this binding are the Plum’s specialty 7075 aluminum, and then steel and high strength plastic to house the heel.

What We Think Could Be Improved

For those that want even more comfort, the heel could be perhaps refined into the future to allow for spinning it with a ski pole.

Filed Under: Reviews Tagged With: Bindings, Plum, Plum Oazo

Review: CAMP Alp Mountain Harness for Ski Mountaineering and Alpinism

October 7, 2019 By Stano Faban Leave a Comment

Overview:

Suitability: ski mountaineering and glacier travel, mountaineering and alpinism, rappels and easy climbing
Usual full price: around $70 USD (at Skimo.co)
Weight: 260g in Medium size (Small, Medium, Large)
Pros: durability, functionality, fit and comfort, low weight
Cons: ease of use could be improved

Bottom Line:

This harness is best for ski mountaineering and glacier travel mainly thanks to its low weight and functionality that allows for putting it on without the need to remove your skis or crampons.

It also performs well for general mountaineering, alpinism and even easy climbing where long vertical falls are not expected. Obviously, this depends on your skill level and judgement.

In the Tantalus Range, British Columbia, Canada.

Review:

We have been using the CAMP Alp Mountain harness for a couple of months now. From glacier travel and ski mountaineering, to alpine mountaineering and even some sports climbing of grades up to 5.10c (6a).

On the beautiful long ridge of Piz Palu in Switzerland.

The single most important feature of this harness is that you can put it on and take it off without removing your skis or crampons but let’s discuss beyond this main characteristic.

In general, thanks to its wide webbing and thin padding on the waist, the harness fits well over any type of clothing as it’s easy to adjust the leg loops and waist belt. It is also very comfortable to wear all day long whether in the winter or summer.

The harness comes in 3 sizes so make sure to choose an optimal fit – not too loose, not too tight – and you can use it for a variety of activities too.

While fairly minimalist, the CAMP Alp Mountain harness offers enough gear loops to carry all your necessary crevasse rescue gear, or your climbing gear when you go mountaineering.

Ski mountaineering and glacier travel are the main activities why you might be looking at this harness. It’s light, it packs small, and when you occasionally need it you can quickly put it on without the hassle of removing your skis. We have definitely enjoyed it for this type of use.

While the harness also works well for general mountaineering and easy climbing you need to remember that it’s not well padded – taking a big fall won’t be very comfortable.

For mountaineering, just like for ski mountaineering, you will appreciate its low weight and overall comfort.

We have been also actively using it for sports climbing but the harness didn’t inspire us to push our limit as its lack of padding makes it not very pleasant to take a fall with.

Another great way to test the comfort of the harness was rappelling. Once loaded, it felt as comfortable as fully padded climbing harnesses. Of course, this might be different if we were to rappel a long vertical route but one could still do it.

What We Think Could Be Improved:

There is not much to complain about when you use this harness for its intended purposes. Perhaps, weight could be shaved further with newer materials and a little bit of colour could add some “liveliness” to the somewhat boring grey.

Filed Under: Reviews Tagged With: Camp, CAMP USA

Mini Review: Arcteryx Norvan SL Trail Running Shoe

October 1, 2019 By Stano Faban Leave a Comment

Fall training for ski mountaineering involves many components, but one primary activity is running and speed hiking steep terrain.

Terrain in your area, fit and running style will ultimately determine which training shoe will work best for you. Recently, we have been trying the Arc’teryx Norvan SL (SuperLight) to work well for fall training on the wet, slippery, rocky terrain on the west coast of British Columbia.

The shoe was originally designed as a lightweight running shoe that could pack small and be brought on multi pitch rock climbing, while still functioning well as a true running shoe. This design focus translates well into a light running shoe designed for fast times on technical uphills and for trails needing an agile, light shoe.

The shoe is built around a minimal mid-sole with Vibram Megagrip rubber connecting you to the trail. This rubber is used in many similar shoes and has always served me well. The durability of the sole is impressive considering the significant grip improvement over Salomon’s contagrip outsoles.

The Norvan’s upper is built out of a TPU mesh rather than a fabric, which does not absorb as much water. The heel cup is very minimal, without the characteristic padding and bulk of a conventional running shoe. Instead, the TPU mesh contours around your foot and makes for a comfortable, adjustable fit.

Considering that the shoe only weighs 185 grams, we have found the durability of the upper mesh to be acceptable. We made a hole in one shoe due to jamming the shoe in a granite crack, but that is outside the scope of the shoe’s design focus and understandable considering the almost unbelievable weight of the shoe.

If you are looking for a lightweight trail shoe with grippy rubber and a medium drop (7mm), you might be hard pressed to find a better option than the Arc’teryx Norvan SL.

Filed Under: Reviews

In-depth La Sportiva shoes review and comparison: Akasha vs Bushido vs Helios SR

June 22, 2019 By Stano Faban 12 Comments

la-sportiva-akasha-bushido-helios-sr

Overview:

  • Suitability:
    • Akasha – long distance trail and mountain running (lots of cushioning)
    • Bushido – technical mountain running and scrambling
    • Helios SR – trail racing and fast & light missions
  • Usual full price:
    • Akasha – around $130 USD
    • Bushido  – around $120 USD
    • Helios SR – around $120 USD
  • Weight (single shoe):
    • Akasha – 330g
    • Bushido – 298g
    • Helios SR – 230g
  • Colours vary between men’s and women’s models

Bottom line:

Despite few irritations, I like all these La Sportiva shoes a lot, with Bushido being my favourite. While each model was designed with different purpose in mind they all excel in an area that matters to me the most – exceptional grip in dry and wet conditions.

Review and Comparison – La Sportiva Akasha vs Bushido vs Helios SR:

As I mentioned in my previous review, I have switched between a couple of trail/mountain running brands over the last decade. After some time, I figured out that grip matters to me the most – the shoe must stick to dry and wet rock very well – because I like to visit technical trails and terrain the most.

Akashas cruising on an alpine trail above Whistler.

How I tested them?

La Sportiva Akasha:
With about 20 runs (mostly between 1-2.5h) in Akashas over the last couple of months I used them on a variety of trails – smooth, rocks, roots. I have not taken them into the alpine for scrambling yet because 1) I use Bushido for that, and 2) the bigger lugs on Akashas (or any similar shoe) aren’t really suitable for that.

La Sportiva Bushido:
Being on my second pair, since I picked them up first two-and-half years ago, they have been my favourite model of all and I don’t even remember how many runs and adventures I took them out for. I put them through everything, especially, I literally abused the first pair – lots of alpine rock and technical terrain in any weather and ran them for two over 50km runs through high mountains. Once they were done, I had to buy a second pair because I enjoyed them so much.

La Sportiva Helios SR:
I exclusively bought them for trail running races and shorter fast training runs. I ran them about 15 times for a maximum of 2h (including 5 races) on a variety of trails in wet and dry over the last year. Since they are built very light I don’t use them too often and have never taken them out for an alpine/scrambling mission. While I don’t want to destroy them, as they are my racing shoes, they have been abused quite well during the races.

la-sportiva-soles-akasha-bushido-helios-sr

Grip/Stickiness comparison

Out of the three, the Bushido has the best grip in wet and dry on any surface except in lots of mud or dusty/gravel trails where the Akasha shoes perform better due to their lugs. For me, Bushido’s grip on rock and in the alpine is so reliable that I wear them even for overnight hiking with a big backpack. As for Helios SR, they grip well anywhere except mud (as they don’t really have any lugs) and I have no problem racing them on wet rocks and roots even after weeks of not using them at all.

Bottom line here is that all three have amazing overall grip/stickiness but each is superior in their specific application.

It shouldn’t be a surprise that La Sportiva makes such grippy running shoes given their history in climbing shoes and boots manufacturing. In my experience with grip, and for my type of running, these three models excel over any other shoes. The only close challenger being the Adidas Skychaser.

Lots of scree, snow and scrambling with Bushidos that day.

Fit & Comfort comparison

Fit and comfort is somewhat difficult to compare since we all have different feet and the three models are intended for different uses.

For me, the snug fit (but not too tight) and the rock-plate feature of the Bushidos provide the most comfort even after many hours of exercise. The shoe is very low profile, and the heal and lacing holds the foot inside very securely. Also, I like the design of the Bushido’s toe box protection which saved my thumbs many times.

The Akasha fits sligthly bigger/looser than the Bushido but still quite securely. Such fit design is no surprise as they are intended for longer runs and ultra-marathons during which our feet might swell. Overall, I find them comfortable and the sole being nicely soft. The lacing can be improved though, perhaps La Sportiva just needs to use the same lace holes/loops like on the Bushido. Although, not as stiff as on Bushidos, the Akashas have a great toe box protection as well.

Now, onto the Helios SR. I have to say they have a bit of a “funny” built, thus, they don’t fit me perfectly yet they are very comfortable on majority of trails. I think the toe box (or the very tip of the shoe) sticks out too much for no good reason. The lacing system is well designed and keeps the foot secure. Overall, the thick foam in the sole makes them very soft (or buttery-feel like), thus, very comfortable unless the trail is full of small sharp rocks – then the wave sole lets in some painful pokes.

6h hiko-run-scrambling mission over glaciers and ridges using Bushidos.

Induced differences in running technique

Switching between the 3 shoes often in the last couple of months let me feel subtle differences in how they “make” me run:

  • Akasha – with a 6mm drop but a thicker sole than I am used to (heel: 26mm, toe: 20mm) I could feel I am higher above ground and that the shoe is easier to heel-strike than the other two. For me, as more of a neutral foot striker, this is fine on downhills but somewhat “gets” in the way on flat. It usually takes me couple of minutes to adjust my technique to strike them neutral-to-forefoot. I would prefer if the heel was slightly smaller and the sole there a bit thinner.
  • Bushido – with the same 6mm drop as Akasha but a fairly low-profile sole (heel: 19mm, toe: 13mm), they feel easier to run neutrally or front-foot for me. Also, due to their stiffer sole, they feel more like “road-racing flats”.
  • Helios SR – according to La Sportiva, there is only a 2mm drop (heel: 21mm, toe: 19mm) and they do feel quite flat. However, due to the very soft sole they definitely feel like having less cushioning than the Bushido. With all that, plus the extreme flexibility of the sole (which comes at a cost discussed further down), it is easy to run them any way you like.

Built quality comparison

Since all three models are designed and built for different purposes it is understandable their durability will differ as well.

I have yet to see really any wear & tear on my Akashas. The uppers look still almost like new while there are only superficial signs of wear on the soles.

The Helios SR is built for pure speed, thus, very light materials and design solutions were used. Everything is lasting well for me except the sticky black sole which seems to be shedding away rather quickly. That’s why I am using them mostly for racing only.

The two pairs of Bushidos I own (one is no retired) have been lasting well for me given the amount of abuse, although, they showed some weakness.With the sole being constructed of couple of layers and pieces I observed there were small separations appearing after about ten runs.

Initially, this scared me but with each pair the shoes kept that state from there on. It seems like that there is tension and forces between the glued layers/sections and the first couple of runs stress the shoe enough to release it. While it takes a bit of charm from the shoes it won’t stop me from getting another pair now that I know this does not affect the long-term performance and durability of the shoes.

Which one to choose?

By now, it should be quite obvious which model(s) you should choose given your objectives but lets recap:

  • Choose Akasha for regular training and high mileage on variety of trails, and long races. They are a work horse.
  • Choose Bushido if you do lots of technical running and even scrambling in the alpine. They are also great for technical races that feature lots of rocks/boulders.
  • Choose Helios SR for racing and light & fast speed missions in the mountains.

What can be improved about these shoes:

From my experience, there are two things I would ask La Sportiva to improve:

  • Adopt the Bushido lacing system/solution for Akasha.
  • Either insert a rock plate under the front-foot or cover the whole front-foot area on Helios SR with rubber sole instead of just certain sections like now. This would improve protection from small sharp rocks yet should still keep the weight low.

Stores that sell these La Sportiva shoes:

  • Backcountry.com
    • men’s
    • women’s
  • REI.com
    • men’s
    • women’s
  • CampSaver.com
    • men’s
    • women’s
  • MooseJaw.com
    • men’s
    • women’s

Filed Under: Reviews Tagged With: La Sportiva, mountain running, trail running

Review of Julbo Aero Sunglasses: Perfect for Ski Mountaineering to Cycling and Everything Between

October 23, 2018 By Stano Faban 1 Comment

julbo-aero-review-sunglasses

Quick Overview:

Usual Retail Price: $130-250 depending on the lens
Weight: 34g only!
Lens we tested: Zebra Light lens – category 1-3 photochromic lens
Pros: very light, transition lens (category 1-3), anti-fogging, fit
Cons: didn’t really find any

Bottom Line:

Thanks to their fit and transition lenses Julbo Aero sunglasses work very well for a variety of outdoor sports. Their “airy” design helps the lens to stay ventilated which makes the sunglasses especially suitable for high output but low speed activities such as breaking trail in the winter or trail running.

Product Description and How We Tested It:

I started using the Aero sunglasses last spring for ski touring and a bit of xc skiing. As the seasons went by I have been using them also for cycling, hiking, running, mountaineering.
I would say that the best features of the Aeros are their anti-fogging capability, the transition lens and fit, so I will focus mainly on these three aspects in this review.

Me, on the right, wearing the Julbo Aero on a very bright day but with lots of N facing skiing so I preferred the lighter lens compared to the Montebianco model. Eric used a darker lens.

We all know that when sunglasses fog up too often then their other features don’t matter much because the whole point of sport sunglasses is to enhance our sight in challenging conditions, and of course, to protect our eyes.
Julbo Aero combines anti-fogging coating on its lens and ventilation-friendly design to keep the lenses clear even while I was breaking trail on skis in warmer and humid conditions.
While you can choose from a variety of lenses for these glasses, I recommend to go with a type that provides transition from category 1 (very light) to category 3 (medium dark). My Aeros have the Zebra photochromic lens with the category 1-3 transition which I found to be super useful for everything I do.

Riding the 2,757m high Passo Stelvio on a cold October day wearing the Aeros.

Of course, for bright days on snow or on a glacier the Julbo Montebianco offer better eye protection – find our review here – with their lenses transitioning from category 2 to 4.
The Aeros design features light weight construction using only top frame. This makes for a wide viewing range, which I find essential for ski touring, and also saves on weight.
The stems are quite long and have lots of rubber coating. This makes them hold in place even during running and while keeping them on my ski toque or head when I am not using them. Width-adjustable nose pads help to customize and fine-tune the fit even more.
julbo-aero-review-sunglasses-2
Overall, I recommend these sunglasses for any sport. Their look is very sporty so if you are looking for something more stylish then check out the our review of the Julbo Montebianco model.

What We Think Could Be Improved:

There is not much I found that should be improved on these sunglasses as they work very well for the purposes and environments they were designed for. So it’s just about individual preferences and fit – I would say they probably fit better medium-to-larger faces.

Buying Julbo Aero online:

  • at Backcountry.com
  • at CampSaver.com
  • directly from Julbo.com


Filed Under: Reviews Tagged With: Julbo, sunglasses

Review of Karpos Race Skimo Racing Suit: Faster transitions, Breathability, Comfort

October 20, 2018 By Stano Faban 4 Comments

karpos-race-skimo-suit

Quick overview:

Usual Retail Price: around $300 USD
Weight: 530g (size L)
Pros: Pockets, Fit, Comfort, Breathability
Cons: Could use warmer fabric panel on knees
Suitability: skimo racing
Colour Options: There are a couple of variations you can find in stores. Two designs on the left, in the picture above, are the 2017/18 colours.

Bottom Line:

Karpos skimo race suit features practical outside pockets for faster transitions and overall efficiency. This race suits is perfect for warmer/spring conditions but can be easily adapted for colder days by wearing underwear of various thickness.

Product description and How we tested it:

We have used the Karpos Race suit for over 20 times now in various conditions – from warm spring sunny days to -15 Celsius (5 Fahrenheit), and in wet snow and cold deep powder.
This well designed piece of skimo wear comes from Italian outdoor clothing division of the well-known Sportful brand that manufactures custom clothing for many professional cycling teams and some national teams in other sports.
The Karpos Race suit is used by Italian and Spanish skimo national teams so you have most likely seen them in many photos and videos over the years.
Sizing is accurate, just make sure to follow Karpos sizing guide when thinking of buying one.
The whole suit is predominantly made using Lycra Power fabric that is defined on Karpos website as “fabric with a high degree of stretch, thanks to 250g Lycra Power and 30% elastane. Offers maximum support and muscle compression while at the same time allowing complete freedom of movement. Tear-resistant and offers UV protection.”
At first glance and try, the Karpos suit feels thinner than most other skimo race suits. We can confirm that this makes it highly breathable, even providing a cooling-like feeling in warm conditions. On colder days (below -8C), we definitely had to wear a warmer underwear than with Crazy Idea NRG suit for example (which can get quite warm in the spring).
Now, starting from the top down, let’s take a look at various features this race suit has to offer.
When fully zipped up, the collar stands tall and fits tight, providing a good overall protection in windy conditions. Fleece lining inside the collar (and around wrists) create a warm and comfortable feeling.
Shoulder fabric is thicker for improved durability and features “rubberized” silicone anti-slip inserts that provide extra grip for race pack shoulder straps.
Chest area pockets are where Karpos suit differs from other suits on the market:

  • There are two large stretchable mesh pockets on the outside that can store skins (without the need of opening the suit), or other larger items such as a drink flask or glasses. These two big pockets allow for really fast transitions.
  • Then there are two smaller pockets – one on each side – with vertical zippers that are great for storing gels, energy bars, phone or your car keys during a workout.

The inside of the chest area has one zipper pocket for your avalanche beacon (big enough to snugly fit Pieps DSP) and features a larger horizontal pocket, across the belly, for warmer skins storage.
Another distinctive feature of the Karpos skimo suit is that the upper body (torso) portion of the suit is semi-separated from the bottom half (leg) portion. While the back side is sewn into one piece, the front side features an “invisible” horizontal gap that allows for quick access to the inside of suit (and makes for easy peeing for male athletes).
There is a large ventilating mesh panel on the back side that spans from the lower back all the way up to under the neck. This provides for great ventilation but does let in cold air in lower back area in tail wind conditions.
Suit’s fit around the hips, thighs, knees and calves will obviously depend from person to person but the stretchy fabric should easily accommodate for many body types, without looking loose even on skinny athletes.
While the whole front side of the suit (top to bottom) feels like it has some kind of a “wind-protective” finish, the knees area could benefit from an extra windproof panel, or a warmer fabric, to protect knee joints on colder days and during downhills. The crotch area has a Windstopper insert and does offer good protection in descents.
Boot “gaiters”, made of durable Cordura fabric, allow for cutting custom holes for various models of skimo race boots. Overall, they fit well over most boots and do a good job at preventing snow from getting in.
Our overall practical experience with the Karpos Race suit has been very positive but there a few small things that can be improved.

What can be improved:

As mentioned already, the knee area could benefit from a warmer fabric panel. This might make less sense in Europe but would be great for Scandinavian countries and cold North American states and provinces.
Then the bottom of the big back side mesh panel could perhaps end a little higher, thus, offering better wind protection on windy days and during descents. However, this is likely something that other race suit manufacturers are trying to figure out as well.

Buying Karpos Race skimo suit:

  • for $300 USD at Skimo.co
  • at various other stores outside of North America

Filed Under: Reviews Tagged With: Karpos

  • Page 1
  • Page 2
  • Page 3
  • Next Page »

Primary Sidebar

  • Facebook
  • Instagram
  • YouTube
Our Facebook Page

skimo-manual-banner-300px
 

Recent Articles

  • Kilian Jornet Interview: About His New Foundation, His Own Environmental Impact, and How He Wants To Help Athletes and The Outdoor Industry To Protect Nature
  • How Fast Are Glaciers Really Melting? How Will This Affect Your Mountain Adventures? Interview with Pascal Egli
  • Book Review – Art of Freedom: The Life and Climbs of Voytek Kurtyka
  • Forest Skis: Innovative, Custom Build, For Backcountry Skiing and Freeride
  • Lighter and Completely Redesigned: New CAMP Ultralight Ski Mountaineering Ice Axes

Categories

  • Contests & Giveaways
  • Crazy Tracks
  • Events & Races
  • Gear, Tech & Food
  • General News & Articles
  • Industry Press Releases
  • Movies & Books
  • News Shorts
  • People (Interviews)
  • Racing 101
  • Reports & Results
  • Reviews
  • Skimo Racing
  • Training, Tricks & Tips
  • Trip Reports & Conditions

Footer

About SkinTrack

Travelling through snowy mountains on skis is like flying… and experiencing life at its core.

Gear reviews, interviews, adventures, contests, skills, skimo training, race reports – we connect you to all things related to self-propelled skiing.

SkinTrack.com, created by Stano Faban, was born out of passion for ski mountaineering and ski touring. Over the years, it has become one of the most popular ski mountaineering blogs in North America.

Recent Articles

  • Kilian Jornet Interview: About His New Foundation, His Own Environmental Impact, and How He Wants To Help Athletes and The Outdoor Industry To Protect Nature
  • How Fast Are Glaciers Really Melting? How Will This Affect Your Mountain Adventures? Interview with Pascal Egli
  • Book Review – Art of Freedom: The Life and Climbs of Voytek Kurtyka
  • Forest Skis: Innovative, Custom Build, For Backcountry Skiing and Freeride
  • Lighter and Completely Redesigned: New CAMP Ultralight Ski Mountaineering Ice Axes

Useful Links

Comparing the lightest: Skis | Boots | Bindings

Skimo Training: Training Plans | Videos

Stay in Touch

  • Facebook
  • Instagram
  • Twitter
  • YouTube

Copyright © 2025 SkinTrack.com. All rights reserved.