• Skip to primary navigation
  • Skip to content
  • Skip to primary sidebar
  • Skip to footer

SkinTrack

  • Lightest Gear
    • Skis
    • Boots
    • Bindings
    • Skins
    • Packs
  • Skimo Training
    • Training Plans + Skimo Manual
    • Transitions Videos
  • Facebook
  • Instagram

avalanche safety

Gear Guide To Your First Skimo Racing Setup: Skis, Boots, Bindings, and more

December 20, 2016 By Stano Faban 16 Comments

When it comes to shopping for your first-ever skimo racing setup there is no “fit-for-all” advice as each person’s goals, budget and athletic background are different. Some are new to skimo racing or even ski touring altogether while others have already achieved some athletic success in other endurance sports and want to give skimo a serious try from the start.
With all that in mind, I will do my best to provide the most useful and honest advice for everyone new to skimo, and point them to the right gear that is currently on the market.
Majority of the below mentioned gear can be purchased online or in person from our two favourite skimo specialized stores – Skimo.co in Salt Lake City and Cripple Creek Backcountry in Vail or Carbondale.

Boots

Don’t make the mistake focusing only on weight and price. Fit is very important when it comes to boots as it will determine how well you will be able to control the tiny race skis on descents as well as for how comfortable you will be training in them.

La Sportiva Syborg, Dynafit PDG, Scarpa Alien
The most suitable entry level racing boots are the La Sportiva Syborg, Dynafit PDG and Scarpa Alien. All three are similar weight (800-850g/boot in size 27MP) and are priced around $750 USD (700 Euro, $1000 CAD) depending on the deal you find. Therefore, your decision should come down mostly to already mentioned fit and availability.
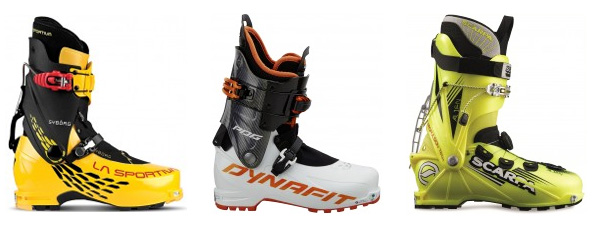
Only slightly heavier but more suitable for regular touring with bigger skis are the new Dynafit TLT7 Performance and Atomic Backland Carbon Light, both weighing just over 1kg/boot in size 27MP. Both are priced around $900 USD (850 Euro, $1200 CAD).
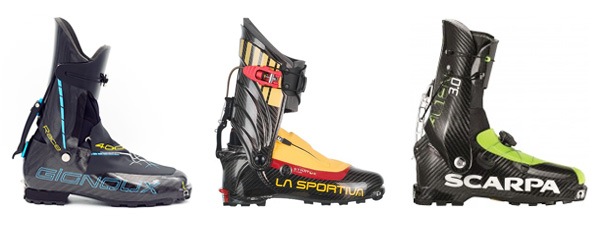
For those that are ambitious right from the start or can spend more money, you can try jumping straight into the Dynafit DyNA (basically a lighter PDG) or Scarpa Alien 1.0. Then the very top level boots, even more expensive, are the Pierre Gignoux Race 400, Dynafit DNA, La Sportiva Stratos (Cube and Hi-Cube), and Scarpa Alien 3.0.
Pierre Gignoux Race 400 (virtually the same as Dynafit DNA), La Sportiva Stratos Hi-Cube, Scarpa Alien 3.0
Pierre Gignoux Race 400 (Dynafit DNA is vitually the same), La Sportiva Stratos Hi-Cube, Scarpa Alien 3.0

Skis

There are many skimo race skis on the market so I won’t list them all but I will give you a couple of pointers and will mention only those with the best price-to-weight ratio.
The good news is that the “entry level” skimo skis are generally only about 100-150g heavier that the top line yet costing about 20-30% less.
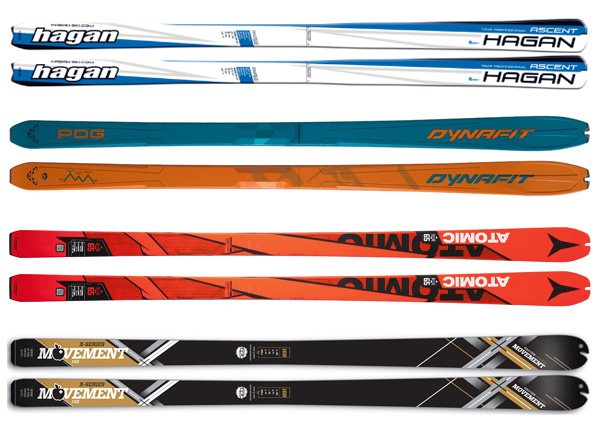
For racing, there is a rule that men’s skis have to be at least 160cm long while women’s can be 10cm shorter. You should be looking for skis weighing less then 900-1000g/ski and not wider than about 68mm (ideally 64-66mm) since all racing skins are manufactured for those widths.
To get you on race skis without paying the top price you should check out Hagan Ascent, Dynafit PDG, Atomic Backland UL 65, Voile WSP, Movement Gold Fish-X, or older models of race skis from these brands that can be still found on sale. You will pay around $600-700 USD ($800-950 CAD, 570-670 Euro)  for all of the above new models.

From the top: Hagan Ascent, Dynafit PDG, Atomic Backland UL 65, Movement Gold Fish-X
Overall, it’s difficult to recommend specific skis for a specific skier because it depends on your weight, height and style of skiing – aggressive, careful, expert skier, intermediate skier, etc. But in general all of them will ski somewhat similarly – the first couple of times, it will feel like you need to learn to ski again 😉

Bindings

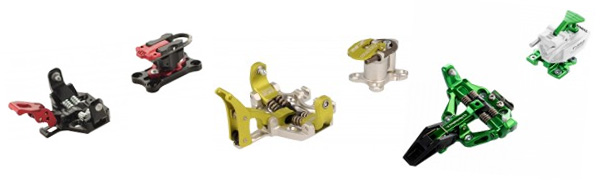
There are three important things when shopping for race bindings (even “entry level”):

  • With few exceptions, all models can be mounted only for one boot size as the heels have no adjust-ability!
  • Don’t mix-and-match toe and heel pieces from two different brands on your race skis. First, it’s race illegal, and second it could pose a safety issue.
  • Buy a model without the auto-lock feature – it’s forbidden by the sport’s rules. This means that when you step into the toe piece it won’t lock itself right into the touring (or locked-out) mode automatically but rather you have to nudge it to that position.

The good news is that all bindings listed will likely last you for many seasons. The only maintenance you will need to perform is changing the heel pins every 2-3 seasons (they are cheap).
Here are the models we recommend: Hagan ZR (optional mounting plates allow heel to move), Plum Race 150, Plum Race 170 (possible to adjust heel for 2-3 different boot sizes!), Dynafit Superlight 2.0, Kreuzspitze SCTT, ATK Race SLR World Cup.

Plum Race 150, Hagan ZR, Dynafit Superlite 2.0
Plum Race 170, Hagan ZR, Dynafit Superlite 2.0
Once shopping, expect to pay around $500-600 USD (470-570 Euro, $650-800 CAD) for the models mentioned above.

Skins

Thankfully, there is not much to contemplate about “entry level” skins. You can just buy any skins that fit your race skis and are preferably made of mohair (or similar fast gliding fiber). The width should be about 3-6mm narrower than the middle of your skis – in general, race skins are pre-cut to 58-62mm and are the same width in their full length.
With that, we recommend buying the skimo race skins: Pomoca Race and Race Pro 2.0 models, Colltext PDG, Dynafit Speedskin, Ski Trab World Cup, Hagan Mohair.
Some race skins can be bought in a roll or as an ready-to-go package with bungee cord tip attachments already in place. The cost for a pair of skins will be around $100-160 USD (90-150 Euro, $130-220 CAD).

Pack

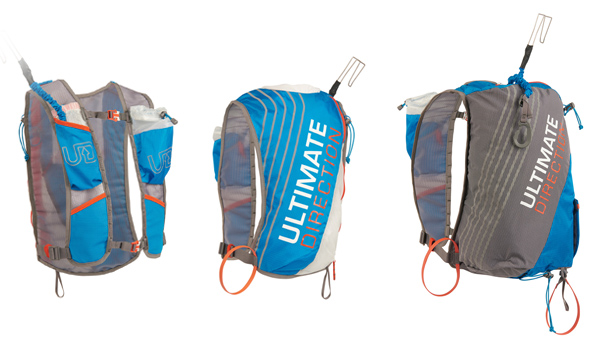
There are many skimo race packs on the market and more-or-less all of them perform quite well but like with boots the fit is important, and that is the crux with almost all packs if you are either smaller or taller than an average male (175-185cm / 5′ 7″ to 6′). The best idea is to try some on first or buy the one that lets you adjust the sizing.
All of last season, we worked with Ultimate Direction to design two race packs that allow for size adjustments and even come in two different sizes – the first skimo packs to ever do this! Both of them borrow some features from their famous running vests that we seamlessly merged with the necessary skimo functionality. Check them out: UD Skimo 8 vest and UD Skimo 18 vest.
For a new skimo racing pack/vest, expect to pay about $100-160 USD (90-150 Euro, $130-220 CAD).

Ultimate Direction vests: Skimo 8 front, Skimo 8 back, Skimo 18 back

Helmet

With new regulations coming into effect this season, we recommend buying only helmets that are fully compatible with these new rules – we wrote a whole article about this a couple of weeks ago so there you can find all the right models.
Beyond that, even more than with boots and packs, the fit is very important! And if there is some space for a bandanna/buff to slide inside for those cold days then even better.
skimo-helmets-matchup

Skimo Race Suit & Clothing

novice-skimo-racing-clothing
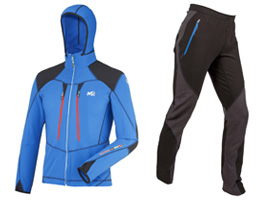
While skimo race suits are fine pieces of gear designed for the most efficient skins management and ventilation I don’t think a novice to the sport needs one for their first couple of races. As long as your clothing is well/slim fitting and your jacket has some nice pockets for skins then you will be just fine.
The middle ground between a full-on one piece race suit and just slim fitting touring clothing are some double-piece “suit” options. Perhaps buying just a jacket will give you most of what a one-piece suit can offer.
One-piece skimo racing suits cost around $250-350 USD (240-340 Euro, $340-470 CAD) while the two-piece solutions would come to about the same if you buy both the bottom and the top.

Ski Poles

Just like with the race suit, you don’t need specific skimo race poles for your first couple of events and most of your training. Light ski touring poles will do. In fact, even top racers use pretty much just shorter xc skiing poles as they work quite well.
To figure out the correct length for your ski poles see this article on how to do it – How to choose the right length (and kind) of skimo racing poles for you.
Prices will range from $80 to $180 USD.

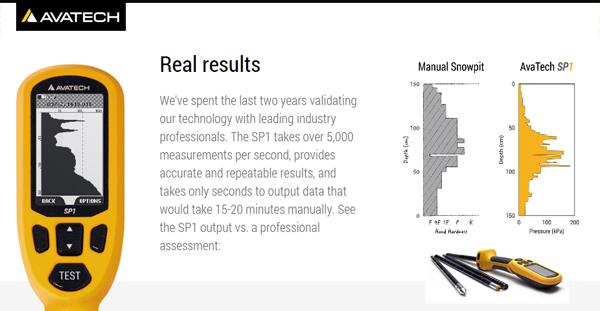
Avalanche Gear & Training

Last but not least, let’s take a brief look at the avalanche gear you will need for racing and your training. On top of that, you should also take at least some basic avalanche courses to educate yourself how to use this gear the most effectively as well as to how to avoid avalanches altogether.
Avalanche beacon – choose a 3-antenna beacon from reputable brands like Pieps, Mammut, Backcountry Access, Ortovox. Prices will range from $300 to $500 USD.
Avalanche probe – for racing you only need a 240cm probe but if you are going to buy only one then we recommend 280cm or 320cm length. The extra length is beneficial should you find yourself in a real rescue. Carbon probes are lighter than aluminum but are also more expensive – we leave it up to you to choose. Prices will range from $50 to $150 USD.
Snow shovel – just like with a probe, to meet skimo racing regulations you only need a “kid’s toy” shovel like CAMP Crest but we recommend buying a more robust shovel that is actually usable in a rescue scenario. If you opt for something with a short handle but strong blade of decent size then you will be way more equiped. Prices will range from $50 to $100 USD.

Final thoughts

After reading the whole article it may seem that skimo racing is a super expensive sport but it is possible to be strategic with your spending. You can buy a lot of used gear (don’t do this with avalanche beacon) or using online sales and package deals from specialized shops like Skimo.co or Cripple Creek BC. Also, remember, that lots of this gear will last you for many years and will take you to place no expensive carbon bike can ever do.
If you would like to know more about race gear and even skimo training then check out our Manual For Ski Mountaineering Racing where we discuss specific how-to tricks.

Filed Under: Gear, Tech & Food, Skimo Racing Tagged With: avalanche safety, Bindings, skimo boots, skimo helmet, Skimo pack, skimo racing gear, Skins, Skis

Game changer: AvaTech SP1 snow profile probe and AvaNet data sharing platform

October 7, 2014 By Stano Faban Leave a Comment

Today, I had great time recording a podcast session with folks from AvaTech – the company behind two totally new revolutionary products in the snow safety industry.
The episode will be out in couple of days and will feature more gear talk then just today’s session. But for now, here’s an intro of the cool AvaTech’s products.
avatech-graphic-teaser-article

AvaTech SP1 snow probe

On September 15, AvaTech revealed the SP1 to the world through the intro video on their YouTube channel. Since then (about 20 days) the video saw almost 30,000 views which I would say is breathtaking since the product has a very specific/niche application.
What SP1 is?
The Sp1 is a probe-like device that “…is designed to help professionals understand the snowpack more quickly, accurately and objectively, and then share that information with the broader mountain community.”
AvaTech’s SP1 proactive snow safety device that reads snowpack structure, slope angle and aspect in seconds and then geo-tags the data, and uploads it real-time onto the AvaNet platform. AvaNet will dramatically increase the amount of data snow professionals can share and analyze, providing a unique geo-spatial database of crowd-sourced snowpack observations. Snow professionals will be able to gather more information and make better decisions with consistent data powered by this proprietary technology developed while at the Massachusetts Institute of Technology. Finally, professionals will also be able to rapidly upload their own manual snowpack observations with AvaTech’s Snowpit Editor, which features geo-tagging, photo upload and multiple forms of data visualization.

What SP1 isn’t?
The most two important points here are that:

  1. The SP1 does not replace sound decision making. It only helps to paint the picture and share lots of data in real-time and over time with anyone that chooses to listen.
  2. It is not an avalanche probe. It is a snow analysis tool.

Future and more details
As I mentioned above, for more insights on this revolutionary product look out for the new SkinTrack podcast episode but in the mean time check out the AvaTech’s website for more details.
Potential plans/possibilities include a device that would be more intended for use by general backcountry skiers and not just professionals. For now, professionals will be relied on as data collectors but really anyone can sign up for data access through an annual subscription to the AvaNet platform.

Filed Under: Gear, Tech & Food Tagged With: avalanche safety, AvaNet, AvaTech, AvaTech SP1, snow study

Buying backcountry skiing, alpine touring and avalanche safety gear

October 14, 2009 By Stano Faban 6 Comments

This article is from a series on “How to start backcountry skiing and alpine touring?”. Visit the link to see an outline of all the topics.
Now that you skied off piste in knee deep powder with your friends and learnt some very useful things in the avalanche safety course, you are hooked. If not, then something went wrong while you were reading the two preceding articles from this series, please go back and re-read 🙂
When you are truly aboard you will need some basic gear that will get you further into the backcountry. The choices are immense these days, so your budget will be your biggest definer.
The basic fact with backcountry skiing is that since we need to climb up before we go down, the weight of your gear is very important. Light gear means faster uphills but may not provide the best control for downhill. Heavy gear doesn’t necessarily mean great downhill control but definitely means tougher climbing.
There are three ways to go about this:
•    you take someone’s advice and stick with it
•    you start experimenting on your own
•    or you combine the two
In my opinion, the best thing to listen to some advice but experiment as well. And eventually you should gradually hone your skills and technique that will allow you to eventually tour with lighter gear without compromising anything.
Below is a fairly long yet still quite brief overview of all basic equipment (that you will need) divided into sections: skis, boots, bindings, climbing skins, avalanche safety gear, and backpacks & clothing.

Skis for backcountry and alpine touring

Fat, skinny, light, heavy – the preference should be made on what you plan on skiing the most, whether powder or more of a harder snow.
skis
The best, before you really find your soul, is to go the middle way. Get backcountry skis with around 80-90mm width under the foot. Pick something in the middle of this range and you should be fine for now.
Lengthwise, get a pair that is about the same height as you are, or the skinnier the skis the longer they can be while the opposite is true for fatter skis.
The weight of skis will depend on the length of the ski. At 80-90mm width the weight will generally vary from 1300g to 2200g per ski.
Most popular backcountry ski brands are Atomic, Ski Trab, Dynafit, Black Diamond, K2, G3, Dynastar and Goode.
The usual price range is between $500 to $800. To get a better idea you can check out a wide backcountry skis selection at Backcountry.com.

Alpine touring boots

Backcountry (or alpine touring) ski boots have a lot to do with how well you will be controlling your ride. Again, the obvious properties are light or heavy, however, for good control you need to consider things such as:
boots•    how many buckles a boot has
•    how high the boots are
•    how well do the boots fit
The number of buckles ranges from two to five (to maybe more on some models) and this pretty much defines how well the boots will fit your feet. The better fit, the better control. But again be aware of the weight.
For starters, go with three to five buckles, with a heat moldable liner. The weight of these will be around 1400g to 1900g per boot. Weight significantly depends on the size of the boot.
There are four major alpine touring boots manufacturers: Scarpa, Dynafit, Garmont, Black Diamond. Scarpa and Dynafit will most likely have something for everybody from weight cautions to best downhill performers. Garmont and Black Diamond are focused more towards the downhill performance, so you might not find as light boots in their selection.
The usual price range is between $600 to $800, and again you can check out Backcountry.com to see what’s out there since they seem to have the widest selection in North America. Also, you can check out MEC.ca as they carry lots of models too.

Alpine touring bindings

Fifteen and more years ago the market in Europe was dominated by Silvretta. In North America there were different brands since telemark skiing was much more popular than a fixed heel.
biddingsThen Dynafit came out with a revolutionary Dynafit LowTech binding that changed everything. This was primarily due to the very innovative functionality design which shaved pounds and pounds of weight off the previous touring models.
Over the years Dynafit bindings proved to be at least as durable as anything else on the market. However, your choice should be still made based on some other facts.
If you like to ski the resorts on your backcountry skis or if you ski more in the resorts than in backcountry then you can for Black Diamond’s Diamir bindings since it gives you more clearance above the ground and skiing feels more like on normal bindings. Marker’s Duke bidding belongs in this category too.
Anyone else should pretty much consider only Dynafit. Nowadays, the brand offers various models yet all of them are way lighter than any other brand’s models. And the simplicity of the design means that there is a lot less to break than on any other models.
Dynafit design is specific in a way that not all alpine touring boots can be used with their bindings, however, now all boot manufacturers have at least couple of models that are Dynafit compatible. So no worries.
Also, you may consider “alpine touring adapters” for normal biddings. Those can be easily locked in your downhill bindings and provide a climbing mode for you. You can use these with your downhill ski boots. But beware you will be hauling a lots of weight up the hills with this setup.
Most recommended alpine touring bindings brands are Dynafit, Black Diamond’s Diamir and Silvretta. G3 has recently released an alpine touring bidding too, so if you are like to test new things that might be your choice.
Again, to see what’s out there go to Backcountry.com. Prices will range mostly between $350 to $500.

Telemark skiing gear – skis, boots, bindings

Being not a telemark skier myself (but soon to try) I will give it my best to introduce you to the tools of the trade. (Original photo of the telemark skier is from John Baldwin collection.)
telemark-skiingTelemark skiing (or telemarking) gear consists of the exactly same components as alpine touring – skis, boots and bindings. However, this gear functions differently due to the downhill technique of the marvelous telemark turn.
Telemark skis
Many people are using alpine touring skis (or all mountain skis) for telemarking or even skiers are using tele skis for skiing. Although, that definitely says something about compatibility telemark skis, in general, are somewhat softer and narrower than backcountry skis. However, in recent years they are catching up with the fatness.
When choosing the right ski for you, you need to consider your height, weight and skill just like with normal skis. The best is to ask an experienced tele skier but you should not go wrong with a length that matches your height. And the deeper the snow you plan on riding the fatter the skis need to be.
Usual prices for telemark skis would be about the same as for alpine touring skis, between $500 to $800.
The most popular manufacturers that offer specialized telemark skis are Karhu, Voile, K2, Atomic, Black Diamond, G3, Ski Trab and Rossignol.
Telemark boots
Telemark boots are different from any other ski boots at a first glance. They feature a bellow that allows for a “bending motion” of the boot that is necessary for dropping low when carving the tele turn.
telemark-bootImportant differences among telemark boots, including the weight factor, are:

  • How soft or stiff a boot is?
  • How tall or low a boot is?

To have more control for downhill as well as to have a more precision for aggressive skiing (or jumping) you should be choosing some of the beefier boots that are stiffer and taller. On the other hand, if you want more comfort while climbing then a softer, lower boot will do.
Telemark boots as well have about the same price point as alpine touring boots – $600 to $800.
There is not as many specialized telemark boots manufacturers as for telemark skis, however, there are plenty of boots to chose from. The most popular brands are Scarpa, Black Diamond, Garmont and Crispi.
Telemark bindings
Telemark binding is responsible for making the core differences between telemarking and backcountry skiing downhill techniques. Telemark skis and boots are just follow ups of this tele gear component.
telemark-bindingIn the past, the biggest concern for telemark skiers (and those that wanted to try it) was a lack of releasability of their bindings in a case of a fall. Therefore, facing a potentially nasty “beating” of your head by your attached skis or spraining your knees. This has been dealt with in the recent years by improved binding models.
A cool feature with some of the latest tele bindings is that you can adjust its stiffness. This would affect your downhill control (aggressive vs relaxed). I am not sure how much telemark skiers fiddle with this “setting” while on their skis, however, it is something that alpine touring equipment is missing.
Telemark bindings price range is a bit wider than for backcountry skiing bindings and it’s nice to see the price drop even under $200 on some models. However, you can pay almost as much as $500 for a pair.
These days, telemark binding manufacturers offer a wide choice from different models. The most notable brands are Black Diamond, 7tm, Voile, G3 and Rottefella.
Where to buy telemark skiing gear?
You can buy specialized tele equipment at the same online stores that sell alpine touring gear. So Backcountry.com and MEC.ca will do, with MEC.ca having a better selecion of the bindings and boots.

Climbing skins

Skins are divided usually into three categories – mohair skins, synthetic and mixed. The more mohair, the better glide (less energy, goes faster), but absorbs water in warm conditions quicker. The more synthetic, the less glide but somewhat more durable. The mixed models are a mix of bought.
climbing-skinsMake your first pair of skins synthetic or mixed ones and maybe after a season or two treat yourself with mohair skins for glacier skinning days.
When buying skins you need to consider the length and the width of your skis. Skins are now usually sold in about 2m length, but the widths will differ. It’s always better to buy fatter ones, then trim them to fit your skis as oppose to have skins too narrow.
Popular brands for climbing skins in North America are Black Diamond, G3 and Dynafit; in Europe it would be more Coltex, Pomoca and Ski Trab.
Backcountry.com carries about 15 different types of skins with prices ranging from $120 to $190.

Avalanche safety gear

Avalanche safety gear is a package of three items which function together in a case of an avalanche accident – avalanche beacon (or some times called transceiver), snow shovel and avalanche probe.
The most trickiest to chose is the avalanche beacon, mostly due to the wide range of prices (from $200 to $600).
avy-safety-gearThe shovel and probe are more straight forward with each costing only around $40 to $80. Pick a shovel with an extendable handle and a metal blade as this gives you the best tool to dig with. For the probe, don’t go shorter than 240cm, preferably buy one that is 320cm long.
As for the avalanche beacon, the recommendation is to ask friends that have experience in using one or your instructor at your avalanche course. How to chose an avalanche beacon is a whole new topic, so I won’t discuss it in this article.
A new piece of safety equipment to consider is an avalanche airbag. After pulling a handle a bag full of air infaltes around you or your head. This protects you from trauma injuries as well as helps you to stay above the floating snow.
There are very few manufacturers around the world that focus avalanche safety equipment, and these would be pretty much it: Ortovox, Backcountry Access, Pieps, G3, Mammut/Barryvox, Pulse.
You can find the widest selection of avalanche safety gear at BackcountrySafety.com or at Backcountry.com.

Clothing and backpacks

Most of the clothing you need for backcountry skiing can be the same as you use in a resort. The main difference would be the top layers. Buy a breathable jacket for uphills (soft shell) that has some wind proof properties. The same is true for pants with more emphasis on the breathable part.
ski-clothing-packsFor downhill or more stormy days you should have some heavier duty windproof and waterproof gear. The most recommended are jackets and pants made out of GoreTex fabric.
Then you will need some thin gloves for climbing and a pair of warm ones for skiing, or when the conditions turn bad. The same goes for hats.
All of the extra clothing and avalanche safety gear is best carried in a backpack along with some water and a bit of food. The choices for backpacks are great, but to start buy a pack that is around 25 to 35 liters large and features straps that allow you to attach your skis, this is very useful for boot packing.
This is the category where you will find the biggest selection of all equipment and the most popular brands for clothing and backpacks for backcountry skiing are The North Face, Arc’Teryx, Marmot, Patagonia, Mountain Hardware, Columbia, Mammut…
You can go nuts at these online stores: Altrec.com, Backcountry.com, MEC.ca, REI.com and many more.

Altimeter watch

Altimeter watch doesn’t really fit inside any of the above mentioned categories but it’s an essential piece of backcountry skiing equipment, and the more you learn how to use it the more you will appreciate it.
To learn why altimeter watch is a great tool to have see:
Altimeter watch: Why it is important and beneficial to know your altitude?
To get help with buying an altimeter watch see this article:
Buying altimeter watch that fits your needs and budget

Have questions about gear?

If you have any questions or comments about the gear I just introduced you to feel free to ask or discuss below. I will answer the best I can or even write a post about it. And you are all welcome to answer each other’s questions too.

Buying altimeter watch that fits your needs and budget

Filed Under: Gear, Tech & Food, Training, Tricks & Tips Tagged With: altimeter watch, avalanche safety

Sign up for avalanche safety and backcountry travel course

September 5, 2009 By Stano Faban Leave a Comment

This is a second article from the series on “How to start backcountry skiing and alpine touring?”.

As with anything new, we have two choices – learn it ourselves (with help from friends) or register for a course that is led by a true professional in its industry. In this case, the second option costs more money but the learning process is much faster and safer.

Recreational avalanche safety and backcountry travel courses are for novice backcountry skiers and usually take place over one or two days. Students are provided with hand-outs they can keep, and more importantly, with amazing knowledge that is lot of times gained only by experience. Therefore, make sure you sign up for a course that is certified by an appropriate organization in your country.

In Canada and United States this means various guiding companies that are certified (licensed) by the Canadian Avalanche Association or other appropriate authorities to teach these courses. Most of the companies that have mountain (and ski) guiding certifications are suitable.

The skills you will learn at such courses include:

  • recognizing avalanche terrain and danger

  • decision making

  • basic snow properties

  • basic avalanche search and rescue

  • backcountry travel in avalanche terrain based on your experience

  • and more

Filed Under: Training, Tricks & Tips Tagged With: avalanche rescue, avalanche safety, avalanche terrain

Primary Sidebar

  • Facebook
  • Instagram
  • YouTube
Our Facebook Page

skimo-manual-banner-300px
 

Recent Articles

  • Kilian Jornet Interview: About His New Foundation, His Own Environmental Impact, and How He Wants To Help Athletes and The Outdoor Industry To Protect Nature
  • How Fast Are Glaciers Really Melting? How Will This Affect Your Mountain Adventures? Interview with Pascal Egli
  • Book Review – Art of Freedom: The Life and Climbs of Voytek Kurtyka
  • Forest Skis: Innovative, Custom Build, For Backcountry Skiing and Freeride
  • Lighter and Completely Redesigned: New CAMP Ultralight Ski Mountaineering Ice Axes

Categories

  • Contests & Giveaways
  • Crazy Tracks
  • Events & Races
  • Gear, Tech & Food
  • General News & Articles
  • Industry Press Releases
  • Movies & Books
  • News Shorts
  • People (Interviews)
  • Racing 101
  • Reports & Results
  • Reviews
  • Skimo Racing
  • Training, Tricks & Tips
  • Trip Reports & Conditions

Footer

About SkinTrack

Travelling through snowy mountains on skis is like flying… and experiencing life at its core.

Gear reviews, interviews, adventures, contests, skills, skimo training, race reports – we connect you to all things related to self-propelled skiing.

SkinTrack.com, created by Stano Faban, was born out of passion for ski mountaineering and ski touring. Over the years, it has become one of the most popular ski mountaineering blogs in North America.

Recent Articles

  • Kilian Jornet Interview: About His New Foundation, His Own Environmental Impact, and How He Wants To Help Athletes and The Outdoor Industry To Protect Nature
  • How Fast Are Glaciers Really Melting? How Will This Affect Your Mountain Adventures? Interview with Pascal Egli
  • Book Review – Art of Freedom: The Life and Climbs of Voytek Kurtyka
  • Forest Skis: Innovative, Custom Build, For Backcountry Skiing and Freeride
  • Lighter and Completely Redesigned: New CAMP Ultralight Ski Mountaineering Ice Axes

Useful Links

Comparing the lightest: Skis | Boots | Bindings

Skimo Training: Training Plans | Videos

Stay in Touch

  • Facebook
  • Instagram
  • Twitter
  • YouTube

Copyright © 2025 SkinTrack.com. All rights reserved.