• Skip to primary navigation
  • Skip to content
  • Skip to primary sidebar
  • Skip to footer

SkinTrack

  • Lightest Gear
    • Skis
    • Boots
    • Bindings
    • Skins
    • Packs
  • Skimo Training
    • Training Plans + Skimo Manual
    • Transitions Videos
  • Facebook
  • Instagram

trail running

In-depth La Sportiva shoes review and comparison: Akasha vs Bushido vs Helios SR

June 22, 2019 By Stano Faban 12 Comments

la-sportiva-akasha-bushido-helios-sr

Overview:

  • Suitability:
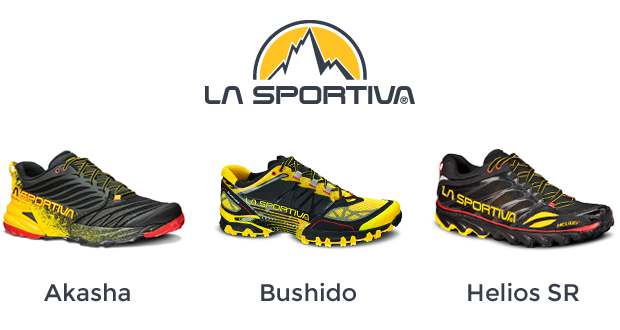
    • Akasha – long distance trail and mountain running (lots of cushioning)
    • Bushido – technical mountain running and scrambling
    • Helios SR – trail racing and fast & light missions
  • Usual full price:
    • Akasha – around $130 USD
    • Bushido  – around $120 USD
    • Helios SR – around $120 USD
  • Weight (single shoe):
    • Akasha – 330g
    • Bushido – 298g
    • Helios SR – 230g
  • Colours vary between men’s and women’s models

Bottom line:

Despite few irritations, I like all these La Sportiva shoes a lot, with Bushido being my favourite. While each model was designed with different purpose in mind they all excel in an area that matters to me the most – exceptional grip in dry and wet conditions.

Review and Comparison – La Sportiva Akasha vs Bushido vs Helios SR:

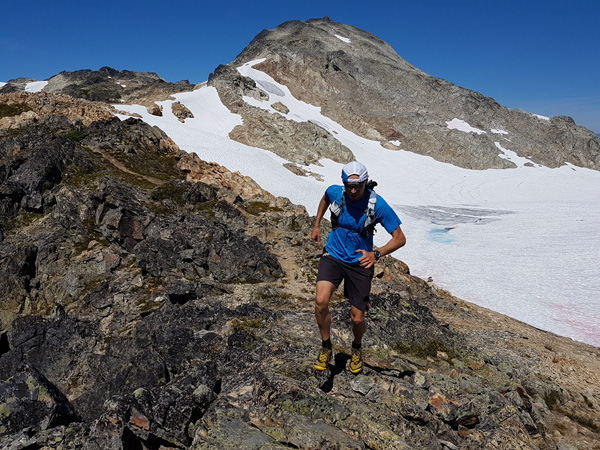
As I mentioned in my previous review, I have switched between a couple of trail/mountain running brands over the last decade. After some time, I figured out that grip matters to me the most – the shoe must stick to dry and wet rock very well – because I like to visit technical trails and terrain the most.

Akashas cruising on an alpine trail above Whistler.

How I tested them?

La Sportiva Akasha:
With about 20 runs (mostly between 1-2.5h) in Akashas over the last couple of months I used them on a variety of trails – smooth, rocks, roots. I have not taken them into the alpine for scrambling yet because 1) I use Bushido for that, and 2) the bigger lugs on Akashas (or any similar shoe) aren’t really suitable for that.

La Sportiva Bushido:
Being on my second pair, since I picked them up first two-and-half years ago, they have been my favourite model of all and I don’t even remember how many runs and adventures I took them out for. I put them through everything, especially, I literally abused the first pair – lots of alpine rock and technical terrain in any weather and ran them for two over 50km runs through high mountains. Once they were done, I had to buy a second pair because I enjoyed them so much.

La Sportiva Helios SR:
I exclusively bought them for trail running races and shorter fast training runs. I ran them about 15 times for a maximum of 2h (including 5 races) on a variety of trails in wet and dry over the last year. Since they are built very light I don’t use them too often and have never taken them out for an alpine/scrambling mission. While I don’t want to destroy them, as they are my racing shoes, they have been abused quite well during the races.

la-sportiva-soles-akasha-bushido-helios-sr

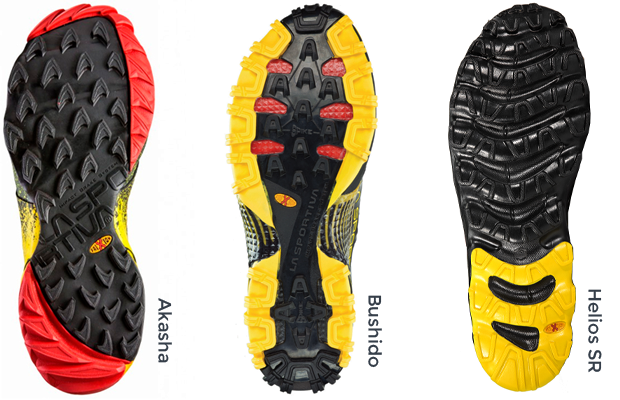
Grip/Stickiness comparison

Out of the three, the Bushido has the best grip in wet and dry on any surface except in lots of mud or dusty/gravel trails where the Akasha shoes perform better due to their lugs. For me, Bushido’s grip on rock and in the alpine is so reliable that I wear them even for overnight hiking with a big backpack. As for Helios SR, they grip well anywhere except mud (as they don’t really have any lugs) and I have no problem racing them on wet rocks and roots even after weeks of not using them at all.

Bottom line here is that all three have amazing overall grip/stickiness but each is superior in their specific application.

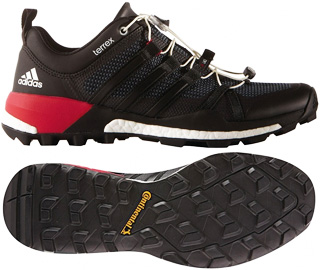
It shouldn’t be a surprise that La Sportiva makes such grippy running shoes given their history in climbing shoes and boots manufacturing. In my experience with grip, and for my type of running, these three models excel over any other shoes. The only close challenger being the Adidas Skychaser.

Lots of scree, snow and scrambling with Bushidos that day.

Fit & Comfort comparison

Fit and comfort is somewhat difficult to compare since we all have different feet and the three models are intended for different uses.

For me, the snug fit (but not too tight) and the rock-plate feature of the Bushidos provide the most comfort even after many hours of exercise. The shoe is very low profile, and the heal and lacing holds the foot inside very securely. Also, I like the design of the Bushido’s toe box protection which saved my thumbs many times.

The Akasha fits sligthly bigger/looser than the Bushido but still quite securely. Such fit design is no surprise as they are intended for longer runs and ultra-marathons during which our feet might swell. Overall, I find them comfortable and the sole being nicely soft. The lacing can be improved though, perhaps La Sportiva just needs to use the same lace holes/loops like on the Bushido. Although, not as stiff as on Bushidos, the Akashas have a great toe box protection as well.

Now, onto the Helios SR. I have to say they have a bit of a “funny” built, thus, they don’t fit me perfectly yet they are very comfortable on majority of trails. I think the toe box (or the very tip of the shoe) sticks out too much for no good reason. The lacing system is well designed and keeps the foot secure. Overall, the thick foam in the sole makes them very soft (or buttery-feel like), thus, very comfortable unless the trail is full of small sharp rocks – then the wave sole lets in some painful pokes.

6h hiko-run-scrambling mission over glaciers and ridges using Bushidos.

Induced differences in running technique

Switching between the 3 shoes often in the last couple of months let me feel subtle differences in how they “make” me run:

  • Akasha – with a 6mm drop but a thicker sole than I am used to (heel: 26mm, toe: 20mm) I could feel I am higher above ground and that the shoe is easier to heel-strike than the other two. For me, as more of a neutral foot striker, this is fine on downhills but somewhat “gets” in the way on flat. It usually takes me couple of minutes to adjust my technique to strike them neutral-to-forefoot. I would prefer if the heel was slightly smaller and the sole there a bit thinner.
  • Bushido – with the same 6mm drop as Akasha but a fairly low-profile sole (heel: 19mm, toe: 13mm), they feel easier to run neutrally or front-foot for me. Also, due to their stiffer sole, they feel more like “road-racing flats”.
  • Helios SR – according to La Sportiva, there is only a 2mm drop (heel: 21mm, toe: 19mm) and they do feel quite flat. However, due to the very soft sole they definitely feel like having less cushioning than the Bushido. With all that, plus the extreme flexibility of the sole (which comes at a cost discussed further down), it is easy to run them any way you like.

Built quality comparison

Since all three models are designed and built for different purposes it is understandable their durability will differ as well.

I have yet to see really any wear & tear on my Akashas. The uppers look still almost like new while there are only superficial signs of wear on the soles.

The Helios SR is built for pure speed, thus, very light materials and design solutions were used. Everything is lasting well for me except the sticky black sole which seems to be shedding away rather quickly. That’s why I am using them mostly for racing only.

The two pairs of Bushidos I own (one is no retired) have been lasting well for me given the amount of abuse, although, they showed some weakness.With the sole being constructed of couple of layers and pieces I observed there were small separations appearing after about ten runs.

Initially, this scared me but with each pair the shoes kept that state from there on. It seems like that there is tension and forces between the glued layers/sections and the first couple of runs stress the shoe enough to release it. While it takes a bit of charm from the shoes it won’t stop me from getting another pair now that I know this does not affect the long-term performance and durability of the shoes.

Which one to choose?

By now, it should be quite obvious which model(s) you should choose given your objectives but lets recap:

  • Choose Akasha for regular training and high mileage on variety of trails, and long races. They are a work horse.
  • Choose Bushido if you do lots of technical running and even scrambling in the alpine. They are also great for technical races that feature lots of rocks/boulders.
  • Choose Helios SR for racing and light & fast speed missions in the mountains.

What can be improved about these shoes:

From my experience, there are two things I would ask La Sportiva to improve:

  • Adopt the Bushido lacing system/solution for Akasha.
  • Either insert a rock plate under the front-foot or cover the whole front-foot area on Helios SR with rubber sole instead of just certain sections like now. This would improve protection from small sharp rocks yet should still keep the weight low.

Stores that sell these La Sportiva shoes:

  • Backcountry.com
    • men’s
    • women’s
  • REI.com
    • men’s
    • women’s
  • CampSaver.com
    • men’s
    • women’s
  • MooseJaw.com
    • men’s
    • women’s

Filed Under: Reviews Tagged With: La Sportiva, mountain running, trail running

Review of Adidas Terrex Skychaser Trail Running Shoes

June 7, 2016 By Stano Faban Leave a Comment

adidas-skychaser-1Quick overview:

  • Usual full price: about $160.00 USD
  • Weight: 325 g (single shoe)
  • Pros: Traction and Grip, Built quality, Breathable
  • Cons: Bigger heel, lacing system (depends on preference)
  • Suitability: Trail running in all conditions and terrain.

Bottom line:

Excellent traction and grip – whether on dry or wet – make Skychaser shoes a great training companion for any day.

Photos:

Product description and How we tested it:

Over the last decade, I have switched between couple of brands for trail & mountain running shoes in a search to find what works best for me. I place big priority on grip – the shoe must stick to dry and wet rock perfectly, otherwise it’s out of the window. That’s the main reason why I stopped running Salomon and totally dig La Sportiva shoes in recent years. The Adidas Skychaser fits in between the two overall but is actually on par with La Sportivas in the grip and traction department.
Adidas describes the Skychasers as stable and protective trail running shoes for rugged mountain runs. The Boost technology is supposed to return energy after every stride while the one piece Continental rubber sole provides ultimate traction and grip.
While it’s hard to say I “felt the boost” the other claims are certainly true. I have ran the Skychasers for over ten times now (1-2.5h sessions), over various terrain and in all conditions, and can honestly say I am very happy with the grip and traction. I mean, my best ever road bike and car tires were Continental so I am that surprised.
I can’t judge the fit very well as I ordered them blind and could definitely use a half-a-size smaller. Despite that they fit me well enough. I think the sizing is quite true but I thought to rather order them slightly bigger than smaller, and I got my wish.
The upper is well-built and has a clean look & feel. While breath-ability and draining are excellent the materials used for the upper appear to be strong and I am confident the shoes will last. The tongue features a “rubberized” top part that seemed stiff at the first glance but actually wraps my ankle very comfortably.
The sole features big lugs, is thicker than I am used to (23mm heel, 17mm forefoot) and with the beefy heel I definitely feel higher above the ground. Overall, the sole has a good solid yet comfortable feel while running. The heel is very stable and quite soft when descending but I would prefer if it was slightly narrower.
I won’t discuss the lacing system much as I think it’s a very personal preference – I simply like traditional laces more. I can certainly live with both the Adidas and Salomon speed lacing and while there are differences between the two I would say they are equally good.
To go a level higher from Skychasers definitely consider its GTX version or another model – Terrex Agravic GTX shoes. The Agravic shoes look similar except couple of small details that might make the difference depending on your preferences – traditional lacing, Gore-Tex membrane…

Pros:

  • Excellent grip and traction
  • Built quality
  • Different colour combinations

What can be improved about this product:

It’s difficult to poke holes into Adidas shoes as I was very happy with all of the three or four pairs I owned before. But if I could change two things on the Skychaser then I would:

  • Make the heel smaller – not thinner but less volume on the perimeter.
  • Replace the laces with traditional ones 😉

Product Specs:

  • Upper: Synthetic Textile
  • Midsole: TPU, Boost, Pro-Moderator
  • Sole: Continental Rubber
  • Insole: Molded OrthoLite
  • Drop: 6mm (23.5mm to 17.5mm)
  • Sizing: men’s US 6 – 12, 13, 14

Online stores that sell Adidas Skychaser shoes:

  • $159.95 at Backcountry.com (various colours, GTX model)
  • $103 at CampSaver.com both men’s and women’s models
  • $107 – $150 at Backcountry.com (the Agravic models including women’s and GTX)
  • And at both Adidas.com and Adidas.ca websites

Filed Under: Reviews Tagged With: Adidas, mountain running, Shoe, trail running

How to Start Running After a Skimo Season Without Getting Injured

April 30, 2016 By Stano Faban 5 Comments

Although the ski season is not fully finished yet, we are all thinking about summer activities more and more with every sunrise. A year ago we published a post discussing a couple of general points for Transitioning from Skimo to Summer Training, however, we haven’t talked about specific things related to running, which tends to be the bread-and-butter activity for skimo athletes in summer.
stano-running-needle-peak
We would like to provide you with more in depth advice with how to safely get back into running after spending the previous 4-6 months doing very low-impact sports compared to trail or road running.
The biggest issue for most people is to actually follow a conservative approach because they are super fit coming off a ski season, thus, think that if they can do 5-7h ski sessions then why it should be a big deal to run only 2-3h.

Create a simple plan

If you don’t plan doing any running races this summer, or only very low key, then you can skip to the next sub-heading. But if you would like to compete in a couple of events more seriously then it’s very helpful to decide on this by end of April. With that, also try to pin down what distances, which exact races and their dates.
Unless you kept running a little bit during the winter, or started already in March, then I would recommend to pick your big goals past mid-June or so. This is not only for maximizing your potential, by giving yourself time to peak again, but rather to minimize the chances of injury. Running is a much more strenuous activity on our joints and tendons than ski touring so giving your body enough time to get used to it is never a bad idea.
It’s also wise to pick such races that fit your strengths as a ski mountaineer – with lots of vertical gain, preferably long climbs, and very little flat sections.
Example: If your goal race will be in early August then spend from mid-April to end of May just easing into things (see below). In June and July, there will be plenty of time to ramp up your volume and intensity – remember, you will be carrying lots of fitness from the ski season so it’s mostly about getting used to different mechanics in the most efficient and safe way.

Easing into it: the first 4-6 weeks

The transition period from skis to running is best done while you are still skiing a bit or taking your 2-4 week rest period after a demanding season.
For first two weeks, I would advise against running more than twice a week and spacing the sessions at least 2-3 days apart. Keep each session under an hour, choose softer trails on rolling terrain and keep your pace very relaxed.
Between weeks 3 and 6, you can bump up to 3 runs per week but still keep the pace fairly easy. One of those sessions can be up to two hours if you are a seasoned runner, however, still stick to soft trails. Another session can involve a long climb and a descent for a total of 1.25-1.5h but keep it easy on the descent. Third session can be less than an hour.
During this “easing in” period you could also introduce some running technique exercises such as in the video below and also have fun with running backwards or sideways. All of these will improve your efficiency, agility and joint/muscle strength.

Strength training and stretching as injury prevention

If you rush or skip the above adaptation period then it’s quite possible you will develop injuries that will stop you from running in a couple of weeks. On top of easing into running, you should really consider doing specific exercises that will strengthen and stretch some key areas that might be imbalanced after a ski season.
Next, I am going to point a couple of the most usual problems skimo people face after a long ski season.
Important note:
Most people and even many long-time runners are always trying to fix pains or tightness in various joints or tendons by heavily focusing on stretching. While this seems logical – “let’s stretch it out because it’s tight” – in many cases you should be focusing more on strengthening than stretching. Most of body muscles are balanced by opposite or different muscle groups and a weakness in those groups will cause the balancing group to constantly overload and get tighter.

Stretching your hip flexors

By dragging the weight of our boots and skis, with uphill skinning motion, the whole winter causes many skimo racers and backcountry skiers to develop tight hip flexors. And as if skinning alone wasn’t enough, we often add to developing this problem by jumping right into the car after a day of touring instead of spending a couple of minutes to stretch. Lots of office sitting further exacerbates this issue even more.
So if you haven’t done much maintenance in the winter then it’s a great time to get that hip flexor extension back. Here is a video that shows an effective exercise and easy to do exercise as well as explains the correct form.

Knee pain, IT band syndrome and weak glutes

IT-band
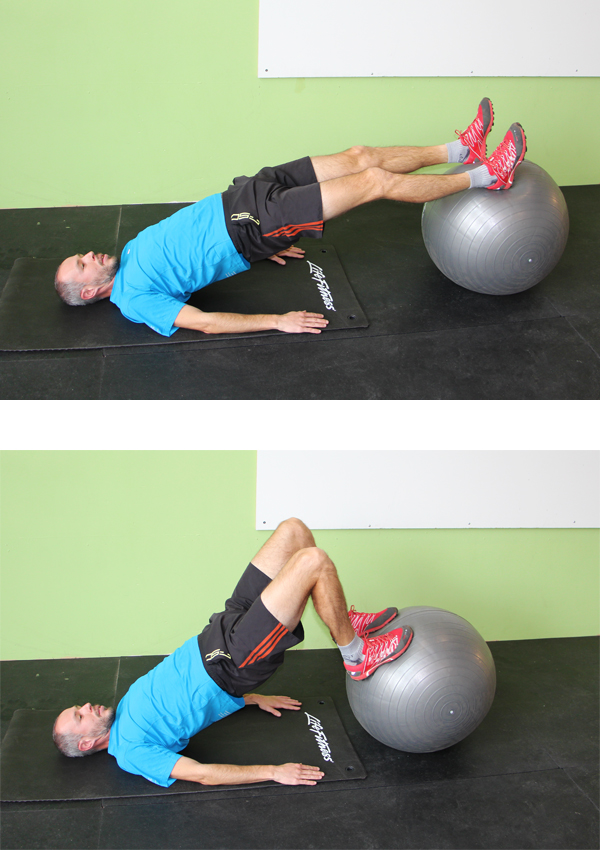
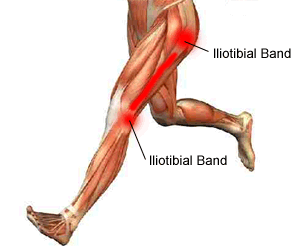
It is not uncommon for skiers to develop IT band syndrome in a couple of weeks by getting back to running after few months off. Here is a good definition of what IT band syndrome is and how it could be felt:

Iliotibial band syndrome occurs when the connective tissue (ligament) extending from the pelvic bone to the shinbone becomes so tight that it rubs against the thighbone. Distance runners are especially susceptible to it. The main symptom is pain between the hip and knees that worsens with activity.

Many people get diagnosed with ITB syndrome after they visit a physio to help them remedy knee pain. But the vast majority never visit a physio and often just rely on “friendly” advice so the only things they start to do is rolling their ITBs on a foam roller and stretching it. This does not solve the root of the problem but just temporary relieves symptoms. Further more, there is plenty of evidence that it’s pretty much impossible to stretch the IT band, however, it is possible to stretch or relax other areas that will feed “slack” into the ITB.
The proper way of dealing with knee pain due to ITB syndrome is strengthen a couple of key muscle groups that have developed weakness over time, thus, are throwing the whole system out of balance, and to stretch or “untighten” others.
This video shows a couple of great exercises to strengthen those key muscles. In most cases, myself included, weak glutes will be responsible for producing knee pain and ITB syndrome. Lots of times, IT band syndrome develops as result of abnormal, out of “alignment”, femur (the big thigh bone) movement which is caused by weak hips that cause our pelvis to drop. This whole chain of reactions is controlled by our “gluteus maximus and medius muscles that are the two major muscles that control the position of our pelvis and overall stability of the leg during the running stride”. Here you can read a lot more about specifics of the IT band issues.

Calf and hamstring muscles strengthening, and Achilles tightness

Eric demonstrating calf raises. Image is from our Manual for Ski Mountaineering Racing Training e-book.
The fact is, and this is something very specific to ski touring, that due to equipment used for skimo and mechanics of the sport we engage our calf muscles very little the whole winter (up to 5-6 months at times!), unless of course if you kept on running during the ski season. Because of that it’s why I like to slowly easy into running and really pay attention to my body in the first couple of weeks.
The shorter runs on soft trails with varying terrain/gradient will start activating those calf muscles and Achilles tendon in a gentle way. Supplement these short runs with a simple, full range of motion exercise like calf raises on stairs and you are setting up a good foundation for the whole season.
We talked about the importance of strengthening the gluteal muscles (glutes) already but another muscle group to pay attention to are your hamstrings. By strengthening them you will balance out the tightness that develops in your quads from skiing.
Stano showing one of the most effective hamstring and glutes exercises. Make sure to"squeeze you butt otherwise you won't engage the glutes much. Image is from our Manual for Ski Mountaineering Racing Training e-book.
Stano showing an effective hamstring and glutes exercises. and”squeeze you butt otherwise you won’t engage the glutes much. Image is from our Manual for Ski Mountaineering Racing Training e-book.
On top of that, glutes and hamstrings have been shown to be the most important muscles in generating the most force for sprinting for running, and I suspect this is also the case for skimo racing sprints. This is due to the fact that for fast sprinting, or shorter distance running, your strides will need to become longer and to sustain a longer stride you will need strong glutes and hamstrings.
Now that you are strengthening the whole back of your leg it is also wise to stretch those muscle groups to make sure they remain fluid and allow for full range of motion. You can find many good stretches for these groups online.

Running beyond those first 6 weeks

Continuing running beyond the adaptation period should be fairly straight-forward as you probably already know from previous years what your body can handle. If you don’t then a general advice would be:

  • To increase your running training load (mileage, time, speed) very conservatively.
  • Not to run more than 4 times a week, unless you absolutely cannot do any other sports or you are very experienced runner.
  • Vary your terrain – from long hills and descents, to rolling, to flat.
  • To watch out for any small pains and aches as these can lead to more serious problems but are easily preventable by proper strength exercises and stretches.
  • Take time off, even up to a week without running, if you feel like your body is getting beat up too much.

As for more intense training and intervals, make sure you are properly warmed up and don’t have any pains – this is more important with running than skimo. Besides that just proceed with intensity workouts based on the same principles like for skimo and other endurance sports such a cycling or xc skiing.
If you are serious about your training and want to learn more how to maximize your time then we highly recommend you check out our Manual for Ski Mountaineering Racing. It dives into endurance training a lot more than a single article can.

Filed Under: Training, Tricks & Tips Tagged With: IT band syndrome, mountain running, Running, skimo training, trail running

Naked Running Band review: Simplicity meets functionality

October 2, 2015 By Stano Faban Leave a Comment

Quick overview:

naked-running-band-5

  • Usual full price: about $39.00 USD
  • Weight: 66 g size V (size 5)
  • Pros: Simplicity, Function, Fit, Comfort, Breathable
  • Cons: None really
  • Suitability: Trail, mountain and road running for up to 2h (training and racing)

Bottom line:

The Naked Running Band is arguably the most minimalist yet functional piece of gear you will ever own.

Photos:

Product description and How we tested it:

When I first learned about the product I didn’t know what to think of it as it seemed too simple. On the other hand, it sure appeared useful enough for my shorter runs. Now, after couple of months of use, with over about 20 outings and one trail race, I can conclude that I really recommend it for all runners.
Being a designer myself (although in the digital world) this product reminds me of a quote by Antoine de Saint-Exupéry:

A designer knows he has achieved perfection not when there is nothing left to add, but when there is nothing left to take away.

The band is dead simple – it is made of a stretchy mesh-like fabric, features 4 independent pockets and simple jacket/shirt holder non-slip bands on the back side. The pockets can securely hold any of these items snugly around your waist during your runs: flasks, smartphone, energy bars, banana, gels, car keys, sun glasses, head lamp, credit cards… Of course, you can’t fit all of these items into the band at once but 4 or 5 are not a problem.
After measuring my waist, I figured out I needed size V (in Roman numerals). Since then the band fits great and became my regular companion on local trails around Vancouver. I don’t use it for all of my short runs, as some times I don’t take anything with me at all, but when I need to carry some water, my phone, and perhaps an extra upper body layer for the downhill then I slip on the Naked Running Band.
One thing I was somewhat questioning at the beginning was whether the band wouldn’t bounce too much while running downhill or on the flats. So far this has only happened to me when I loaded it with many items but even then quick reshuffling smoothed the ride well enough.
Another aspect I questioned was whether I will actually use it that much. It’s obvious the running band isn’t designed for full day outings unless you have plenty of drinking water along the way, however, I find myself using it about once every 2-3 runs so plenty enough to justify it in my gear box.
As for carrying a smartphone, the band works very well but you will need to slip it inside a small zip-lock bag (if you don’t have a water proof-ish cover) to prevent your sweat from getting to it.

Pros:

  • Works very well for what it was designed for
  • Fit and comfort are great
  • Can also be used to supplement your running vest/pack during very long outings or when racing an ultra
  • Made in USA (unlike 99% of such products)

Cons / What can be improved about this product:

I have only two suggestions that I believe can make this great product even better:

  • To make the inside panel of the back pocket (the one touching the runner’s back) from water proof material as my shirt hanging on the outside of it got a little wet when I was sweating heavily on a climb in hot weather.
  • My second suggestion is to perhaps provide a small water-proof bag for car keys or a phone along with the band. (My car opens only with a remote so I am always try to make sure the keys stay dry.)

Product Specs:

  • Materials: 4-way power mesh band
  • Sizing: 6 sizes, from 25 to 36 inches measuring your waist just at the navel

Online stores that carry Naked Running Band:

  • $39 USD at NakedRunningBand.com

Filed Under: Reviews Tagged With: mountain running, naked running band, trail running

Summer Training – New Fastest Known Time on the Howe Sound Crest Trail

August 12, 2014 By Stano Faban Leave a Comment

The Howe Sound Crest Trail mostly follows the ridge crest in this photo from the ferry.
On August 4th, 2014, Gary Robbins set a new fastest known time (FKT) on the Howe Sound Crest Trail (HSCT) in Cypress Provincial Park. Twenty-eight kilometres of alpine and sub alpine terrain that goes from West Vancouver to nearly Squamish, roughly paralleling Highway 99, the HSCT is a popular multi day hike that has become increasingly popular with runners as mountain running takes hold.
The route begins at the base lodge of Cypress Mountain Resort and takes a well maintained path around Mt. Strachan before climbing up and over St. Marks and Unnecessary summits. Past Unnecessary, the trail becomes much more rough as it passes by the well travelled West Lion trail from Lion’s Bay. Beyond the Lions, the trail is steep, rough and overgrown as you pass or climb over Thomas, David, and James peaks before climbing up to the emergency hut at Magnesia Meadows between Harvey and Brunswick Peaks. A short flat section takes you to Hat Pass and the beginning of a long descent down past Deek’s Lake into Porteau Cove on the Sea to Sky Highway.
Slide1At the end of July, Nick Elson and I had a crack at the trail, setting an FKT of 3hrs 51min on a hot day. We hoped our record would stand for a little while but six days later, Gary Robbins made his successful attempt. Gary is an accomplished ultra runner and race director of the Squamish50 Ultra Marathon coming up in a few weeks. Gary also spent his first season training for ski mountaineering this year with us, racing at the Alpental Vertfest in February.
Mountain runs like the HSCT are excellent training for skimo. Between three and four hours of running is similar to a skimo race. The trail requires a mix of running and power hiking as well as significant downhill running that will help contribute to leg strength for the winter.
Here is a quick interview with Gary about his run (and a few notes by me):
hscteleQ: What made you decide to go for the record?
​I have run the HSCT five times now but always with a group of friends. I’d always wondered how fast I could get through that terrain and had intended to do so at some point this summer. It was coincidental that it happened less than a week after Eric and Nick’s run and their time certainly kept me honest out there..
Q: How much of the route were you able to run?
​I was able to run 90% of the descents and about 60% of the climbs. There are some overgrown sections that prevent the ability to run but outside of that whatever grade was runable I managed to force myself to run.
Q: What makes the HSCT a good route to try for an FKT?
​It’s just a classic local route and stunningly beautiful. There are lots of contrived FKTs out there these days, but the HSCT is as pure as it gets, full point to point, no senseless deviations, and linking together some of the best terrain in the lower mainland.
Slide2Q: What was the hardest part of the day?
The climb up on and over Mt. Unnecessary was a definite low point where I was staring to feel the effort.​ (I found the section climbing up to the Harvey-Brunswick Col and Magnesia Meadows to be the most difficult. The trail would be runable if it weren’t so overgrown with low bushes. Even worse, the bushes are only knee to hip height so provide no respite from the sun that was beating down hard. We were also running low on water at this point.)
Q: What was the best part of the day?
​Going over St. Mark’s Summit first thing in the morning, 34 minutes into my run and knowing that I was on FKT pace and feeling like I was about to have a very special day.​ The views from up there always make not stopping and taking it all in a bit of a crime.
Q: Hint for someone looking to run the route in a day?
There is next to no water out there, be prepared and carry ample food and fluids. There are two backcountry huts on the route, both near water sources, other than that there’s nothing else to be had.​
(This is very true. We carried enough water to be self sufficient until the Magnesia Meadows Hut where we refilled. After starting the descent from Hat Pass, you cross several streams and creeks and carrying water is no longer necessary.)
hsct_map

Filed Under: Trip Reports & Conditions Tagged With: FKT, Gary Robbins, Howe Sound Crest Trail, HSCT, trail running

Review of Dynafit Pantera and Pantera GTX trail running shoes

May 23, 2014 By Stano Faban Leave a Comment

Dynafit Pantera & Pantera GTX Overview:

  • dynafit-pantera-gtx-both-main-2
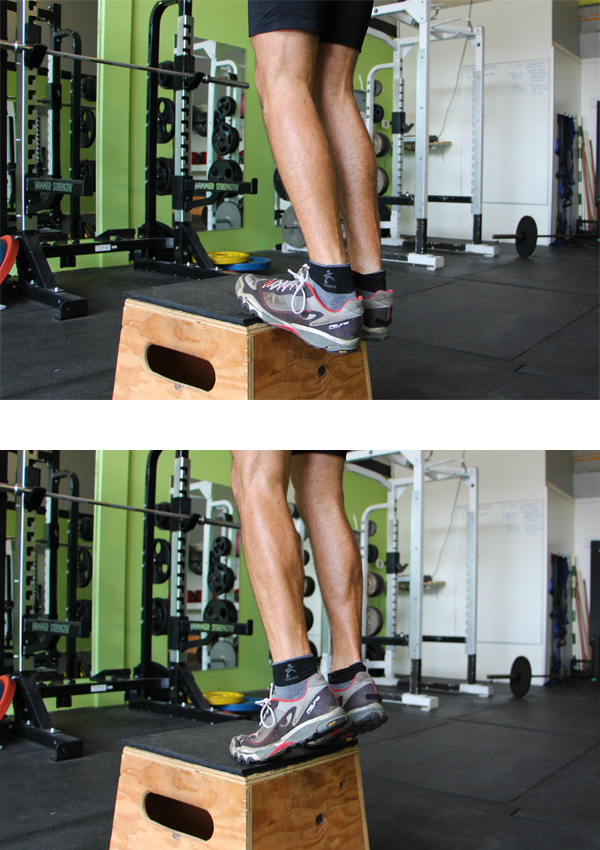
Usual full price: around $140.00 USD  and $160.00 for GTX version
  • Weight: 410 g and 430 g for GTX (10.0 men’s US)
  • Pros: comfortable, good cushioning, traction in mud/gravel, durable
  • Cons: poor grip on rock
  • Suitability: running any distances and all surfaces but specifically better for lots of pavement or running on rocks
  • How we go it: Given for free (disclosure notices)

Bottom line:

I’ll be using the Pantera for longer trail runs in the valley and the Pantera GTX for days in the mountains where I anticipate encountering snow. A good addition to the Dynafit shoe quiver.

Online stores that carry Pantera and Pantera GTX:

  • $110 – $139 for Pantera men’s at Backcountry.com
  • $127 – $159 for Pantera GTX men’s at Backcountry.com
  • $139 at Pantera women’s at Backcountry.com
  • $111 – $139 for Pantera men’s at CampSaver.com
  • $128 – $159 for Pantera GTX men’s at CampSaver.com
  • $127 – $200 at Amazon.com (various models)

Photos:

Product description and How we tested it:

The Pantera is Dynafit’s newest addition to their summer running shoe line (also available in women’s sizes). It is an interesting departure from their usual minimalist attitude towards endurance gear. Not particularly light but well padded and supportive, the Pantera is very different from the ultra-light Feline Ghost.
I’m not a running minimalist and appreciate the extra padding the Pantera’s provide when running on rooty or rocky trails. My feet feel significantly less beat up than when running the same terrain on a less padded shoe. I’m a toe-stubber so a beefy toe cap is always appreciated. The toe is less reinforced compared to the Feline, likely reducing weight without much loss in protection (it still has the ‘Ballistic Bumper Toe Cap’ to afford good protection).
The deep tread pattern provides good traction on dry trails, gravel, dirt, mud, and snow but the grip fails on wet rock. The rubber compound does not seem well suited for technical rock scrambling where a grippier shoe is required. For days when I know I will encounter wet granite slabs, I fall back on my noticeably grippier Dynafit Feline Ghosts.
The Pantera construction seems of good quality. After several hundred kilometres, nothing has torn or ripped and the lacing system is in good condition. The laces start off slippery and quick to come un-tied but after a few muddy runs, the treatment wears off and they stay done up no problem.
I’m not a huge fan of Gore-Tex shoes except in very specific situations with significant amounts of snow or mud. Unfortunately, as soon as we start getting out of the valley and on some real mountain runs (more like walks), mud and especially snow are commonplace. While breathability is compromised (don’t wear them driving on a road trip unless you want sweaty feet), the protection from slushy summer snow is awesome. When postholing across a snow-field or glacier, slush instantly penetrates most trail shoes but the GTX treatment keeps my socks dry. (A good gaiter is necessary to keep snow from coming in the top!)
The reinforced toe and padded heel also accepts a crampon well making the Pantera a good choice for mountain days.

Pros:

  • Comfortable, wide fit with a decent toe box means they are comfortable on long runs.
  • Solid toe and foot protection mean feet take less of a beating on trails.
  • 8mm drop is reasonable compared to some shoes out there.
  • Have taken a beating and still not fallen apart! Durability is good, improved even over other already durable Dynafit shoes.

Cons / What can be improved about this product:

  • I think a better sole compound or shape would improve traction on granite/wet rock for scrambling. For me, this is an issue. For someone running primarily on gravel or dirt/mud, this would be a non-issue as the shoes excel

Online stores that carry Pantera, Pantera GTX and Feline Ghost trail running shoes:

  • $110 – $139 for Pantera men’s at Backcountry.com
  • $127 – $159 for Pantera GTX men’s at Backcountry.com
  • $139 for Pantera women’s at Backcountry.com
  • $58 for Feline Ghost men’s and Backcountry.com
  • 58 for Feline Ghost women’s and Backcountry.com
  • $111 – $139 for Pantera men’s at CampSaver.com
  • $128 – $159 for Pantera GTX men’s at CampSaver.com
  • $127 – $200 at Amazon.com (various models)

Filed Under: Gear, Tech & Food, Reviews Tagged With: Dynafit Pantera, Dynafit Pantera GTX, trail running

Primary Sidebar

  • Facebook
  • Instagram
  • YouTube
Our Facebook Page

skimo-manual-banner-300px
 

Recent Articles

  • Kilian Jornet Interview: About His New Foundation, His Own Environmental Impact, and How He Wants To Help Athletes and The Outdoor Industry To Protect Nature
  • How Fast Are Glaciers Really Melting? How Will This Affect Your Mountain Adventures? Interview with Pascal Egli
  • Book Review – Art of Freedom: The Life and Climbs of Voytek Kurtyka
  • Forest Skis: Innovative, Custom Build, For Backcountry Skiing and Freeride
  • Lighter and Completely Redesigned: New CAMP Ultralight Ski Mountaineering Ice Axes

Categories

  • Contests & Giveaways
  • Crazy Tracks
  • Events & Races
  • Gear, Tech & Food
  • General News & Articles
  • Industry Press Releases
  • Movies & Books
  • News Shorts
  • People (Interviews)
  • Racing 101
  • Reports & Results
  • Reviews
  • Skimo Racing
  • Training, Tricks & Tips
  • Trip Reports & Conditions

Footer

About SkinTrack

Travelling through snowy mountains on skis is like flying… and experiencing life at its core.

Gear reviews, interviews, adventures, contests, skills, skimo training, race reports – we connect you to all things related to self-propelled skiing.

SkinTrack.com, created by Stano Faban, was born out of passion for ski mountaineering and ski touring. Over the years, it has become one of the most popular ski mountaineering blogs in North America.

Recent Articles

  • Kilian Jornet Interview: About His New Foundation, His Own Environmental Impact, and How He Wants To Help Athletes and The Outdoor Industry To Protect Nature
  • How Fast Are Glaciers Really Melting? How Will This Affect Your Mountain Adventures? Interview with Pascal Egli
  • Book Review – Art of Freedom: The Life and Climbs of Voytek Kurtyka
  • Forest Skis: Innovative, Custom Build, For Backcountry Skiing and Freeride
  • Lighter and Completely Redesigned: New CAMP Ultralight Ski Mountaineering Ice Axes

Useful Links

Comparing the lightest: Skis | Boots | Bindings

Skimo Training: Training Plans | Videos

Stay in Touch

  • Facebook
  • Instagram
  • Twitter
  • YouTube

Copyright © 2023 SkinTrack.com. All rights reserved.