• Skip to primary navigation
  • Skip to content
  • Skip to primary sidebar
  • Skip to footer

SkinTrack

  • Lightest Gear
    • Skis
    • Boots
    • Bindings
    • Skins
    • Packs
  • Skimo Training
    • Training Plans + Skimo Manual
    • Transitions Videos
  • Facebook
  • Instagram

Gear, Tech & Food

Naked Running Band review: Simplicity meets functionality

October 2, 2015 By Stano Faban Leave a Comment

Quick overview:

naked-running-band-5

  • Usual full price: about $39.00 USD
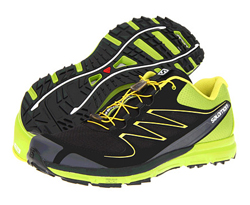
  • Weight: 66 g size V (size 5)
  • Pros: Simplicity, Function, Fit, Comfort, Breathable
  • Cons: None really
  • Suitability: Trail, mountain and road running for up to 2h (training and racing)

Bottom line:

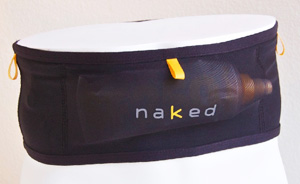
The Naked Running Band is arguably the most minimalist yet functional piece of gear you will ever own.

Photos:

Product description and How we tested it:

When I first learned about the product I didn’t know what to think of it as it seemed too simple. On the other hand, it sure appeared useful enough for my shorter runs. Now, after couple of months of use, with over about 20 outings and one trail race, I can conclude that I really recommend it for all runners.
Being a designer myself (although in the digital world) this product reminds me of a quote by Antoine de Saint-Exupéry:

A designer knows he has achieved perfection not when there is nothing left to add, but when there is nothing left to take away.

The band is dead simple – it is made of a stretchy mesh-like fabric, features 4 independent pockets and simple jacket/shirt holder non-slip bands on the back side. The pockets can securely hold any of these items snugly around your waist during your runs: flasks, smartphone, energy bars, banana, gels, car keys, sun glasses, head lamp, credit cards… Of course, you can’t fit all of these items into the band at once but 4 or 5 are not a problem.
After measuring my waist, I figured out I needed size V (in Roman numerals). Since then the band fits great and became my regular companion on local trails around Vancouver. I don’t use it for all of my short runs, as some times I don’t take anything with me at all, but when I need to carry some water, my phone, and perhaps an extra upper body layer for the downhill then I slip on the Naked Running Band.
One thing I was somewhat questioning at the beginning was whether the band wouldn’t bounce too much while running downhill or on the flats. So far this has only happened to me when I loaded it with many items but even then quick reshuffling smoothed the ride well enough.
Another aspect I questioned was whether I will actually use it that much. It’s obvious the running band isn’t designed for full day outings unless you have plenty of drinking water along the way, however, I find myself using it about once every 2-3 runs so plenty enough to justify it in my gear box.
As for carrying a smartphone, the band works very well but you will need to slip it inside a small zip-lock bag (if you don’t have a water proof-ish cover) to prevent your sweat from getting to it.

Pros:

  • Works very well for what it was designed for
  • Fit and comfort are great
  • Can also be used to supplement your running vest/pack during very long outings or when racing an ultra
  • Made in USA (unlike 99% of such products)

Cons / What can be improved about this product:

I have only two suggestions that I believe can make this great product even better:

  • To make the inside panel of the back pocket (the one touching the runner’s back) from water proof material as my shirt hanging on the outside of it got a little wet when I was sweating heavily on a climb in hot weather.
  • My second suggestion is to perhaps provide a small water-proof bag for car keys or a phone along with the band. (My car opens only with a remote so I am always try to make sure the keys stay dry.)

Product Specs:

  • Materials: 4-way power mesh band
  • Sizing: 6 sizes, from 25 to 36 inches measuring your waist just at the navel

Online stores that carry Naked Running Band:

  • $39 USD at NakedRunningBand.com

Filed Under: Reviews Tagged With: mountain running, naked running band, trail running

New Skimo Gear for 2015-2016 Season

September 28, 2015 By Stano Faban 7 Comments

La Sportiva Sideral 2.0
It’s that time of year when all the manufacturers are coming out with the newest products. Here we want to give you a quick overview of what is new this season. Frankly, it is a relatively quiet one, with very few truly new products. Several companies have given current products some big updates however.
The biggest change of the season is in skimo racing bindings. Weight continues to be shaved off despite new ISMF regulations that require race bindings to have manual locking mechanisms (pulling up on the toe piece to lock in). All the major brands now have a competitive (light weight) binding with a manual lock.

La Sportiva

No major changes to the La Sportiva ski line but the citizen race/ski touring boot – the Sideral – has been update to the 2.0 version. It features improved buckles (borrowed from the Spectre model) and an updated sole that offers compatibility with Tech, Frame and Trab TR2 binding systems.

  • Here is Sideral 2.0 on Skimo.co
  • And at Cripple Creek BC

Dynafit

Dynafit continues to improve its ski running line with the retail release of the 2.0 version of the DNA Race ski, boot, and Low Tech Race binding.

Dynafit Low Tech Race 2.0 Binding
DNA 2.0 ski (and PDG 2.0) – The new DNA ski is 40 grams lighter than the black DyNA thanks to its carbon construction. It is also shaped a bit differently (similar to the Cho-Oyu or Denali shape) compared to previous version, while retaining the same dimensions (99-65-80) and turn radius (20m). The PDG 2.0 adopts the same shape and shaves 25 grams off its predecessor.
DNA Boot (PG RC-1 2.0) – Last year, Dynafit stepped away from their DyNA race boot and began licensing the Pierre Gignoux Morpho 400 as their RC-1 race boot. The 2015/16 DNA Boot is an improved RC-1 with a new color scheme (green and pink to match the skis) as well as an improved sole (way better than the RC-1!), and a new upper cuff strap system. Probably, it will be pretty difficult to find much stock in the US but if you find yourself in Europe it’s much more common over there.
Low Tech Race 2.0 Binding – With ISMF regulations requiring a race binding toe that does not auto lock, the Low Tech Race has taken an TLT Superlight toe piece with locking lever and trimmed it down to the essential material, pairing it with a Gignoux plastic heel piece to create a lightweight (around 100g) binding with a removable crampon attachment.

  • DNA skis on Skimo.co
  • DNA boots (previously RC-1) at Dynafit.com
  • Low Tech 2.0 bindings on Skimo.co
  • Dynafit PDG 2.0 skis on Cripple Creek BC
Plum Race 99 Bindings

Plum

Race 99 Binding – This is an exciting entry into the game from Plum as the lightest all-metal binding on the market at a scant 99 grams. Mount these on any of the lighter skis and you might find yourself needing to add weight to meet the ISMF minimums! We got a chance to check them out at the 2015 Pierra Menta in March and at the Plum factory in Annecy, they are pretty cool!

  • Race 99 on Skimo.co
  • At Cripple Creek BC

Fischer

While racing the World Cup last season, Eric took mental note of all the broken skis that he saw throughout the year, and there were lots! The yellow Fischers topped the list but it looks like they have worked out the issues this year with their new Alp Attack Carbon skis. It has the same design as the (older) yellow version with a new construction and top sheet.
Race binding – Fisher is moving away from ATK as their bindings manufacturer and adopted the Dynafit Low Tech as its own re-branded binding for this season. Using the same toe as the Low Tech described above, it is slightly heavier with the older version Low Tech heel (metal rather than the current plastic Gignoux heel). This unit is likely much more durable for day-to-day use.

Fischer Profoil Skins
Profoil skins – Not really a skimo race quiver but worthy of a mention. The Fischer Profoil skins are just a thin sheet of plastic with no natural or artificial hair. Fischer claims the skins are just as effective climbing, have as good glide as mohair, but due to the material they literally can never ball up with snow (when wet to cold conditions occur). They cannot be trimmed and are only able to be used on a ski of a certain width (to allow room for a certain pattern on the base), but with their light weight and low bulk they could be especially useful on an ultra-wide ski.

  • Alp Attack Carbon skis on Skimo.co
  • Fischer race bindings on Skimo.co
  • Profoil skins on Skimo.co
CAMP Speed 2.0 Helmet

CAMP

Speed 2.0 Helmet – CAMP is responsible for some excellent skimo accessories including their Rapid Racing Pack and their Race 290 crampons, and have now improved their venerable Speed helmet to be slightly lighter and with a new retention system. The Speed 2.0 helmet is comfortable for racing and does not to conflict much with sunglasses or a light light hat.

  • CAMP Speed on Skimo.co

Ski Trab

Gara Titan binding – Ski Trab’s new binding comes in at just over 100g (slightly less than Dynafit Low Tech 2.0) and has all the required features plus a new design that allows the tech toe to close without coiled springs on the wings. Being completely new on the market, it may require some testing of the concept but it’s a possible worthy alternative binding.

  • Gara Titan on Skimo.co
Petzl Rad System
Petzl Rad System

Petzl

Rad Line – This is a special 30 meter, 6mm diameter ‘hyperstatic’ cord that can be used for rappelling and for glacier travel. The cord is pre-packaged by Petzl with three lightweight screw-lock carabiners, a double-shoulder length sling (can be used as an anchor or improvised harness), a micro traction (rope capture pulley (for a crevasse rescue), and a Tibloc (for rope ascent), all in a fancy Petzl bag.
The Rad Line is basically a ready-to-go ski mountaineering kit. Perfect for glaciers in the North Cascades, or Chamonix, or dropping into gnarly lines in the Tetons. Pair it with a thicker 30m lead line for harder terrain or use a skinny pull rope for 30m rappels.

  • Petzl Rad Line at Petzl.com

For now, that’s all we have for new 2015-2016 skimo gear. We will have some more in-depth reviews of all of the above products soon! If we’ve missed anything, please give us a shout in the comments below or via our contact form.

Filed Under: Gear, Tech & Food Tagged With: Bindings, Boots, Camp, Dynafit, Fischer, La Sportiva, Petzl, Plum, Ski Trab, Skins, Skis

Review of CEP Compression Progressive+ Ski Merino Socks: Great for ski touring

April 17, 2015 By Stano Faban Leave a Comment

cep-compression-ski-socks-reviewQuick overview:

  • Usual full price: about $69.00 CAD
  • Weight: about 90 g / pair
  • Pros: Fit, Function, Comfort, Odor free
  • Cons: Slightly warm on warm days
  • Suitability: Ski touring, skimo racing, downhill skiing

Bottom line:

Very functional and a very well manufactured piece of gear, little not to like.

Product description and How we tested it:

CEP Compression is known for being one of the best (if not the best) manufacturers of compression products in the world. History of this German brand dates back a couple of decades and quality of their experience comes from healthcare compression garments manufacturing.
CEP describes these Progressive Merino socks as having “clever combination of merino wool and water-repellent synthetic fibers for perfect heat and moisture management” which I found very true, except, my calves felt a bit too warm when I ski toured in them in balmy weather (above zero Celsius) we had this February and March. For such weather, I prefer a much lower or a thinner sock.
As for compression, CEP claims optimum performance and recovery, stability for muscles and joints, and improved coordination. Before trying out these socks, I tried another two brands (Asics and Dynafit) which made me skeptical about the whole compression for performance thing. I do feel (and I believe) that compression socks help me with recovery, especially, if I need to sit or stand for longer periods of time after a hard workout. However, the performance benefit was always lost on me as I never felt comfortable with the pressure around my calves while skiing or running, it felt like too much after about 2h of touring.
The CEP ski socks feel way more comfortable than the other two I tried and my calves feel fresher afterwards, but I cannot say the compression is “helping” or “optimizing” my performance. I would define it more like this – if my feet, shins and calves feel comfortable, dry and happy even after 6-7 hours of ski touring in various conditions then I do like such socks a lot.
Another detail that I think makes these socks great are padded zones or panels that are definitely at the right places, and the fact that they are all blended together with flat seams, thus, providing a nice fit.
Important: As with any other compression garments, make sure to choose the right size for you as that will greatly impact your experience. CEP provides sizing charts on their websites so you won’t have any problems with that.

Pros:

  • Everything a ski sock should be.
  • Heat and moisture management.
  • Fit and comfort.
  • The socks are quite odor-free even after 2-3 days of continuous use.

Cons / What can be improved about this product:

  • If your lower leg never really gets cold then these might be a bit too warm for you for spring touring (around and above zero Celsius).

Product Specs:

  • Materials: 67% polyamide, 23% wool (merino), 10% spandex
  • Sizing: Men’s, Women’s, sizes 2-5

Online stores that carry CEP Compression Ski Socks:

  • $69.99 CAD from CEPcompression.ca (skiing thermo socks model)
  • $69.99 CAD from CEPcompression.ca (race skiing socks)
  • $65.00 USD from CEPcempression.com (the reviewed model)

Filed Under: Reviews Tagged With: CEP Compression, compression socks

Podcast #4: JetForce avalanche airbag, AvaTech SP1 probe, Skimo gear

December 12, 2014 By Stano Faban Leave a Comment

This episode features two interviews that discuss two new exciting products that will increase our safety in the backcountry. There is also a short intro discussing some of the lightest skimo racing gear that is currently available.

JetForce avalanche airbag

The JetForce is a first time avalanche airbag from Black Diamond and uses a fan to inflate the airbag. The fan is electrically  powered with a rechargeable battery. This means you don’t need to replace and fill up any gas cylinders after deploying the airbag, just pack it up inside the backpack and it is ready to deploy again. Black Diamond says you can do four deployments on a fully charged battery.
jetforce-avalanche-airbag
» JetForce on Black Diamond website

AvaTech SP1 snow probe and AvaNET data sharing platform

The AvaTech Sp1 is a probe-like device that “…is designed to help professionals understand the snowpack more quickly, accurately and objectively, and then share that information with the broader mountain community…” through a cloud data sharing platform called AvaNET.
The SP1 is proactive snow safety device that reads snow pack structure, slope angle and aspect in seconds and uploads the data, along with GPS location, in real-time to the AvaNET server. This technology will dramatically increase the amount of data snow professionals can share and analyze, providing a unique geo-spatial database of crowd-sourced snowpack observations. Also, professionals will also be able to upload their own manual snowpack observations with AvaTech’s Snowpit Editor that also features geo-tagging, photo upload and multiple forms of data visualization.
However, it’s important to keep in mind, that the SP1 is not an avalanche probe and it doesn’t replace sound decision making. It is a snow analysis tool.
» AvaTech website
avatech-graphic-teaser-article

Filed Under: Gear, Tech & Food Tagged With: AvaNet, AvaTech SP1, JetForce avalanche airbag, podcast

Review of Hydrapak SoftFlask: Practical little helper

October 20, 2014 By Stano Faban 3 Comments

soft-flask-250
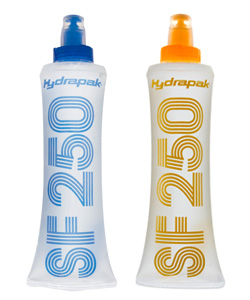
Hydrapak SoftFlask quick overview:

  • Usual full price: $13.99 USD
  • Weight: 24 g (250ml Energy Flask)
  • Pros: Light, Versatile, No Waste, Ease of Use
  • Cons: Durability, Hydration
  • Suitability: Rando racing, ski touring, ultra running, scrambling, alpine climbing, trail running.

Bottom line:

Relatively cheap and an improvement over individual gel packages.

Product description and How we tested it:

Hydrapak is a relative newcomer to the hydration market and primarily a producer of standard plastic water bottles as well as Camelbak-style reservoirs. They also produce a slightly more niche product however, the soft flask. This is a collapsible soft plastic flask in various sizes with a small bite valve at the top. They come in two designs, one in more of a bottle shape ‘for hydration’ and one in a flask shape ‘for energy’. Both types have several size options.
I’ll admit to getting inspiration for this idea by seeing an athlete in one of the ISMF World Cup videos racing with a soft flask taped to their backpack but after a season of running and skiing with versions of these flasks, here are a few of my thoughts:
The 250ml ‘energy’  soft flasks are very useful for skimo races. Around the 2 hr time duration, these races require calorie intake but dealing with the hassle of several gel packets or chewing solid bars is not ideal with gloves and cold fingers. Additionally, cold temps make gels much harder to swallow. My solution has been mixing four gel packs (or using bulk gel from Hammer Nutrition) into a soft flask with water. You avoid any packaging issues and the now slurry like mixture is much easier to swallow. I tape it onto my shoulder strap for no-hand access when it is warm and keep it in my skin suit pocket when it’s cold.
soft-flask-500
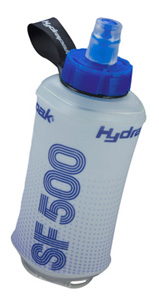
These flasks are also useful for similar length running races and fit well in a vest pocket or just as a handheld. Once you finish the flask, crumple it up and stick it in your shorts pocket.
150ml soft flasks are less useful, but in a short race, where only one shot of gel slurry is needed, it is sufficient and ultra-light.
The 500ml ‘Hydration’ flask is more of a bottle type design. It has a different shape than the ‘nutrition’ flasks and fits well anywhere you would put a standard bottle (vest pockets). I use these to replace the bottles in my vest primarily because they are lighter. Slightly smaller than a standard bottle, they don’t hold as much fluid but are easier to carry as a handheld, even without a strap.

Pros:

  • Eliminates individual gel packaging. No fumbling with package tops. All ready to go at your finger tips.
  • Allows you to create a gel ‘slurry’ by adding water. Much more friendly for consumption during a race.
  • Ease of access – tape it to the strap of your pack for hands-free, or stick it in a running vest pocket or even the pocket of your shorts!
  • Easy to take apart the nozzle for cleaning out scuzzy old gel.

Cons / What can be improved about this product:

  • These are not particularly durable – be careful with duct tape and scissors. Also will not cushion a fall very well if you land on it 🙂
  • Some older/smaller models do not have a function to lock the flask shut. This means it could potentially leak in your bag if squeezed at the nozzle properly. I haven’t really had this happen and the nozzle is pretty well sealed. Not a big deal as long as you are careful

Product Specs (250ml Energy SoftFlask):

  • Weight: 24 grams
  • Materials: Silicone/TPU
  • Size: 150ml and 250ml ‘For Energy’, and 350ml, 500ml, 750ml ‘For Hydration’

Online stores that carry Hydrapak SoftFlasks:

  • $13.99 USD directly from Hydrapak
  • $9.95 USD from Hammer Nutrition

Filed Under: Reviews Tagged With: Fueling, Hydrapak, Hydration, Nutrition, Racing, soft flask, Training

Game changer: AvaTech SP1 snow profile probe and AvaNet data sharing platform

October 7, 2014 By Stano Faban Leave a Comment

Today, I had great time recording a podcast session with folks from AvaTech – the company behind two totally new revolutionary products in the snow safety industry.
The episode will be out in couple of days and will feature more gear talk then just today’s session. But for now, here’s an intro of the cool AvaTech’s products.
avatech-graphic-teaser-article

AvaTech SP1 snow probe

On September 15, AvaTech revealed the SP1 to the world through the intro video on their YouTube channel. Since then (about 20 days) the video saw almost 30,000 views which I would say is breathtaking since the product has a very specific/niche application.
What SP1 is?
The Sp1 is a probe-like device that “…is designed to help professionals understand the snowpack more quickly, accurately and objectively, and then share that information with the broader mountain community.”
AvaTech’s SP1 proactive snow safety device that reads snowpack structure, slope angle and aspect in seconds and then geo-tags the data, and uploads it real-time onto the AvaNet platform. AvaNet will dramatically increase the amount of data snow professionals can share and analyze, providing a unique geo-spatial database of crowd-sourced snowpack observations. Snow professionals will be able to gather more information and make better decisions with consistent data powered by this proprietary technology developed while at the Massachusetts Institute of Technology. Finally, professionals will also be able to rapidly upload their own manual snowpack observations with AvaTech’s Snowpit Editor, which features geo-tagging, photo upload and multiple forms of data visualization.

What SP1 isn’t?
The most two important points here are that:

  1. The SP1 does not replace sound decision making. It only helps to paint the picture and share lots of data in real-time and over time with anyone that chooses to listen.
  2. It is not an avalanche probe. It is a snow analysis tool.

Future and more details
As I mentioned above, for more insights on this revolutionary product look out for the new SkinTrack podcast episode but in the mean time check out the AvaTech’s website for more details.
Potential plans/possibilities include a device that would be more intended for use by general backcountry skiers and not just professionals. For now, professionals will be relied on as data collectors but really anyone can sign up for data access through an annual subscription to the AvaNet platform.

Filed Under: Gear, Tech & Food Tagged With: avalanche safety, AvaNet, AvaTech, AvaTech SP1, snow study

Review of Dynafit Pantera and Pantera GTX trail running shoes

May 23, 2014 By Stano Faban Leave a Comment

Dynafit Pantera & Pantera GTX Overview:

  • dynafit-pantera-gtx-both-main-2Usual full price: around $140.00 USD  and $160.00 for GTX version
  • Weight: 410 g and 430 g for GTX (10.0 men’s US)
  • Pros: comfortable, good cushioning, traction in mud/gravel, durable
  • Cons: poor grip on rock
  • Suitability: running any distances and all surfaces but specifically better for lots of pavement or running on rocks
  • How we go it: Given for free (disclosure notices)

Bottom line:

I’ll be using the Pantera for longer trail runs in the valley and the Pantera GTX for days in the mountains where I anticipate encountering snow. A good addition to the Dynafit shoe quiver.

Online stores that carry Pantera and Pantera GTX:

  • $110 – $139 for Pantera men’s at Backcountry.com
  • $127 – $159 for Pantera GTX men’s at Backcountry.com
  • $139 at Pantera women’s at Backcountry.com
  • $111 – $139 for Pantera men’s at CampSaver.com
  • $128 – $159 for Pantera GTX men’s at CampSaver.com
  • $127 – $200 at Amazon.com (various models)

Photos:

Product description and How we tested it:

The Pantera is Dynafit’s newest addition to their summer running shoe line (also available in women’s sizes). It is an interesting departure from their usual minimalist attitude towards endurance gear. Not particularly light but well padded and supportive, the Pantera is very different from the ultra-light Feline Ghost.
I’m not a running minimalist and appreciate the extra padding the Pantera’s provide when running on rooty or rocky trails. My feet feel significantly less beat up than when running the same terrain on a less padded shoe. I’m a toe-stubber so a beefy toe cap is always appreciated. The toe is less reinforced compared to the Feline, likely reducing weight without much loss in protection (it still has the ‘Ballistic Bumper Toe Cap’ to afford good protection).
The deep tread pattern provides good traction on dry trails, gravel, dirt, mud, and snow but the grip fails on wet rock. The rubber compound does not seem well suited for technical rock scrambling where a grippier shoe is required. For days when I know I will encounter wet granite slabs, I fall back on my noticeably grippier Dynafit Feline Ghosts.
The Pantera construction seems of good quality. After several hundred kilometres, nothing has torn or ripped and the lacing system is in good condition. The laces start off slippery and quick to come un-tied but after a few muddy runs, the treatment wears off and they stay done up no problem.
I’m not a huge fan of Gore-Tex shoes except in very specific situations with significant amounts of snow or mud. Unfortunately, as soon as we start getting out of the valley and on some real mountain runs (more like walks), mud and especially snow are commonplace. While breathability is compromised (don’t wear them driving on a road trip unless you want sweaty feet), the protection from slushy summer snow is awesome. When postholing across a snow-field or glacier, slush instantly penetrates most trail shoes but the GTX treatment keeps my socks dry. (A good gaiter is necessary to keep snow from coming in the top!)
The reinforced toe and padded heel also accepts a crampon well making the Pantera a good choice for mountain days.

Pros:

  • Comfortable, wide fit with a decent toe box means they are comfortable on long runs.
  • Solid toe and foot protection mean feet take less of a beating on trails.
  • 8mm drop is reasonable compared to some shoes out there.
  • Have taken a beating and still not fallen apart! Durability is good, improved even over other already durable Dynafit shoes.

Cons / What can be improved about this product:

  • I think a better sole compound or shape would improve traction on granite/wet rock for scrambling. For me, this is an issue. For someone running primarily on gravel or dirt/mud, this would be a non-issue as the shoes excel

Online stores that carry Pantera, Pantera GTX and Feline Ghost trail running shoes:

  • $110 – $139 for Pantera men’s at Backcountry.com
  • $127 – $159 for Pantera GTX men’s at Backcountry.com
  • $139 for Pantera women’s at Backcountry.com
  • $58 for Feline Ghost men’s and Backcountry.com
  • 58 for Feline Ghost women’s and Backcountry.com
  • $111 – $139 for Pantera men’s at CampSaver.com
  • $128 – $159 for Pantera GTX men’s at CampSaver.com
  • $127 – $200 at Amazon.com (various models)

Filed Under: Gear, Tech & Food, Reviews Tagged With: Dynafit Pantera, Dynafit Pantera GTX, trail running

How to make a ski hook for rapid backpack skis attachment?

May 6, 2014 By Stano Faban 4 Comments

A recent conversation with a SkinTrack follower on Twitter prompted me to write this DIY/How To article. Over the years, I have owned couple of skimo racing and ski touring packs so I have a good experience with what works and what doesn’t (meaning, it works less than I would like). So let’s go.

Final products: 2 ski hooks. Left one is a single rod, middle one double which makes it stronger, and the right one was my template.

Two good systems for fast ski attachment

In the last 10 years or so, two systems were developed allowing skimo racers to attach their skis to their backpacks without ever taking their pack off.
The first one, before ISMF rules allowed the hook system, was very secure and quickly became popular. It worked like this:

  1. You took off your skis and put them together.
  2. Then holding them both in one hand, you put the tails of your skis through a loop (flat webbing/sling) on the bottom right or left side of the pack.
  3. You slid them down until the heel bindings stopped the skis in place.
  4. You pulled the skis closer to your neck with one hand and wrapped a strong bungee cord around them once.
  5. Then you clipped a carabiner at the end of that cord to a plastic or a metal ring that was about half-way down one of your shoulder straps (always the opposite strap to the side where the bottom loop was).

The second system, being widely used now, is the ski hook system. It is not as secure as the first one but it’s very fast. It works the same way like the above until step #4 at which point you just hook a metal hook that is attached to a strong bungee around your skis and you are done. No wrapping or clipping.
Here are photos showing the difference between the two systems:

There's a strong bungee inside that black protective sleeve. You wrapped it around and then clicked the small carabiner into a plastic ring.
There’s a strong bungee inside that black protective sleeve. You wrapped it around and then clicked the small carabiner into a plastic ring.
This is a hook system on a Dynafit Manaslu 35 backpack. Hook is at the end of a strong bungee that is attached about half-ways down on the right side shoulder strap.
This is a hook system on a Dynafit Manaslu 35 backpack. Hook is at the end of a strong bungee/elastic that is attached about half-ways down on the right side shoulder strap.

Making a ski hook system

Since the ski hook system is the more popular one let’s take a look at how you can make one for your pack. Or how you can make a new better hook if you don’t like your current one.

Bottom-side loop

A basic requirement that both above systems have in common is that you need a loop on one of the sides at the bottom of your pack. Depending on a pack you have this might be easier or more difficult to setup but at the end it should look like this:

My regular touring Dynafit 35 L backpack, on the left, uses a very ridged plastic or rubber-like loop. My current 4-years old Ortovox race pack uses just webbing which I like to wrap in colorful duct-tape so it doesn't bend
My regular touring Dynafit 35 L backpack, on the left, uses a very rigid plastic or rubber-like loop. My current 4-years old Ortovox race pack uses just webbing which I like to wrap in colourful duct-tape so it keeps the loop from collapsing and is easier to see when in a hurry.
Also, depending on the width of the skis you are planning to carry you should make this loop big enough. Tails and under-the-foot widths of skimo race skis are around 80 mm and 65 mm respectively. Widths for regular backcountry skis are hard to talk about since all of us have different preferences.
The material I recommend to use for the loop is webbing or an old sling, then wrap it in some duct-tape to make it more rigid (Gorilla tape is the most durable).

Manufacturing the ski hook

Ski hook is not a ski hook – some work great while others not well enough. So what makes a hook work well?
I discovered that if the ski hook is made from a strong, flat piece of material (2 cm wide is enough) then it works the best. And, of course, the dimensions and the way it is bend play big roles too.
Without reinventing the wheel I took my two favourite packs and took a closer look at their hooks – the way they are shaped and the dimensions they have. Surprisingly, they are very similar despite the metal pieces they are made of are totally different.
Here is how they compare:

As you can see, dimension-wise they are very similar except the width. The Ortovox hook on the right secures the skis a bit better but is also a bit bulky.
As you can see, dimension-wise they are very similar except the width. Shape-wise, from the side, they are almost the same as well. The Ortovox hook on the right secures the skis a bit better but is also a bit bulky.
For this How To tutorial I decided to make the Dynafit style ski hook since it works well with a wide variety of skis and the materials and tools needed are easier to come by.
This is what you need (or what I used):

  • 40 cm long piece of 1/8″ (3.15 mm) thick, easy to work with yet very strong metal rod (or wire with similar properties and diameter), preferably one that will not rust.
    I bought something labeled as “solid brass” which appeared easy enough to shape and apparently doesn’t rust.
  • Then you will need lineman’s or combination pliers,
  • and vice could be useful as well.

Here’s the process:
Step 1 – Dimensions

These add up to 18 cm for one end, so 36 cm in total. I went with 4 cm extra to account for the curves and curls. It worked perfectly.
These add up to 18 cm for one end/arm, so 36 cm in total. I went with 4 cm extra to account for the curves and curls. It worked perfectly.
Step 2 – Curl both ends of the rod so you don’t cut yourself. (You can use a file to smooth the ends before you curl them if you want.)
The loops will be handy for running bungee cord through them.
The curls will be handy for running a bungee cord through them.
Step 3 – Bend the rod exactly in half. I used a balcony railing to wrap the rod around and then finished it using a vice.
At the bottom, you can see that after bending the rod and curling the ends I ended up with about 18,5 cm of running length.
Step 4 – Bend the 5,5 cm part to 90 degrees using a vice because now you will be bending two rods at once.
Step 5 – To finish off, bend the 9 cm part to 90 degrees which will leave you with about  3,5 cm piece in the middle.
Since I was bending both rods at once again I started in a vice but ultimately had to finish it with my hands and pliers since I didn't have enough space in the vice to finish to 90 degrees.
Since I was bending both rods at once again I started in a vice but ultimately had to finish it with my hands and pliers since I didn’t have enough space in the vice to go to 90 degrees.
Step 6 – Maybe you should try the single rod hook first to get used to the material. I didn’t but made one at the end since some race packs use that version (which in my opinion is very wobbly).
Final products: 2 ski hooks. Left one is a single rod, middle one double which makes it stronger, and the right one was my template.
Final thoughts on manufacturing the hook:
I believe the secret of a good ski hook is in 4 things:

  • Making the 90 degree bends as tight/sharp as possible,
  • keeping everything else as straight as possible,
  • making the parallel parts long enough (not obsessing about extra weight),
  • and making it either a double rod hook or from a flat material.

I ultimately don’t know why single rod hooks don’t work as well but it is either due to one of the following reasons or a combination of them. On some backpacks the hooks are:

  • either too short,
  • or the 2 bends are more like a one big curve,
  • or simply a single rod doesn’t have enough side leverage to hold the skis in place sufficiently.

Attaching bungee cord to the hook

I couldn’t find a strong/thick enough bungee at home so I used a thinner one I use for making skin attachments. (Working on that How To tutorial as well.) However, if you are just replacing your existing hook you will have some cord to work with.

I just used a figure eight know for the attachment.
As you can see above, I bent the two ends/rods of the hook away from each other based on the Dynafit ski hook. This should add your home made hook stability/leverage once wrapped around the skis. However, it would be beneficial to insert a piece of small plastic tubing in between the rod ends that would always keep them apart because if you use a softer material the ends will be pulled together once the bungee is under load.

Attaching bungee to your pack

You will need to do this if you are building a brand new carrying system on a pack, and you should not need to if you are just replacing a bad hook.
If you are building a brand new ski hook system then depending on what kind of straps, plastic or metal pieces your backpack has on its shoulder straps this will be easy or more difficult.
Important – remember to attach your cord with a hook to the opposite shoulder strap than on what side you placed your bottom-side loop. And use a strong bungee.
On the photo below, I am pretending the pack has clean, smooth shoulder straps so I am just attaching the bungee to the top of the strap to prevent it from moving once under load. It would be desirable to attach it further down the shoulder strap if you can figure out how to secure it there. Duct-tape? 🙂

sdfd

Ultimately, to figure out the right length of the bungee you will need to play around a bit. My suggestion is to start with a bungee or an elastic not longer than 10-15 cm when stretched.
That should be all you need to know on how to make your own ski hook.

Filed Under: Gear, Tech & Food, Training, Tricks & Tips Tagged With: ski hook

Hydration & Overhydration in Endurance Sports: Book Review of Waterlogged by Tim Noakes

April 25, 2014 By Stano Faban 2 Comments

waterlogged-book-tim-noakesWaterlogged book overview:

  • Usual full price: around $25.00 USD
  • Pages: over 400
  • Pros: lots of details, very useful, fairly easy to understand, chapter summaries
  • Cons: lots of similar stories to drive the point home
  • Suitability: from beginners to serious athletes in any sport, lots of great knowledge and practical advice
  • How we go it: Birthday present (disclosure notices)

Bottom line:

In my opinion, “Waterlogged – The Serious Problem of Overhydration in Endurance Sports” is a must read for anyone that is interested in hydration. Tim Noakes – a well respected and credible sports scientist – effectively dismantles lots of myths and pseudo-science that were promoted onto the sports community in the last 30+ years.
In order to get the most out of the book you do not have to read it cover to cover, unless you need every single detail to convince you he is right.

Amazon carries the Waterlogged:

  • $16-25 at Amazon.com

Book description and Our review:

The book was published on May 1st, 2012 and the 400 pages make quite the bible! However, once you start reading you quickly understand that Tim Noakes spent over three decades to research hydration and overhydration himself as well as he reviewed over thousands of scientific papers and books published on these subjects to present us with his conclusions.
Noakes mostly wrote the book to prevent any future deaths from overhydration during endurance sports but in the process he also answers why, what, and how much do we really need to drink to maximize our performance.
He also exposes the hydration industry for its misleading information:

Dehydration in those who drink ad libitum (at one’s own thirst) has no proven detrimental effect on athletic performance. – Tim Noakes in Chapter 5 where he discusses Gatorade at length
Neither muscle cramps nor heat illnesses are caused by sodium deficiency. – Tim Noakes

Waterlogged chapter list to show you everything Noakes discusses:

Chapter 1 – Perspectives on Human Physiology and Hydration

Chapter 2 – Thirst as a Signal for Fluid Intake

Chapter 3 – Water’s Role in Thermoregulation

Chapter 4 – Salt Balance in the Body

Chapter 5 – Emergence of the Sports Drink Industry

Chapter 6 – The Shaky Science of Hydration

Chapter 7 – Early Drinking Guidelines

Chapter 8 – Discovery of Exercise-Associated Hyponatremia

Chapter 9 – The Biology of EAH

Chapter 10 – EAH and EAHE on a Global Scale

Chapter 11 – Guidelines for Fluid Intake

I went on to read this book some months after watching couple of Tim Noakes presentations that I found on YouTube. Through those videos as well as further reading-up on him as a scientist I opened the book with great enthusiasm and a general belief that what he concludes should be true. This allowed me to skip pages occasionally as Noakes, for me, went into too much detail and repeated similar examples/stories too many times.
Each chapter seemed to be constructed roughly the same – he presents what he found or thinks, then provides overwhelming evidence to support this, dismantles old beliefs, and nicely goes onto summarizing the whole chapter knowledge and recommendations on just one page. So just like a I said above, if you believe him as a scientist, you do not have to read every single paragraph or even page.
In this 4 min video Tim Noakes discusses basic principles of hydration:

And if you care, in this 15 min TEDx talk Tim Noakes discusses his body of work which also includes Central Governor theory that basically states that not (only) muscle fatigue but brain regulates athletic performance:

Pros:

  • Tons of detail and scientific evidence.
  • Lots of practical advice and knowledge you can apply to your every day life and training.
  • Superb value for the buck.
  • Fairly easy to understand.
  • The summaries at the end of each chapter are well done and easy to understand.

Cons:

  • It’s long.
  • You might need to look up some medical and biology terms, but not too often.

Waterlogged on Amazon.com:

  • $16 – $25 at Amazon.com (various models)

Filed Under: Gear, Tech & Food, Reviews, Training, Tricks & Tips Tagged With: dehydration, Hydration, Tim Noakes, Waterlogged

40 runs Review of Salomon Sense Mantra trail running shoes

April 18, 2014 By Stano Faban Leave a Comment

Salomon Sense Mantra Overview:

  • salomon-sense-mantra-main-imgUsual full price: around $120.00 USD
  • Weight: 270 g (8.5 men’s US)
  • Pros: great fit, light, low drop, keeps you close to the ground
  • Cons: the sole wears out fast on rocks or hard/abrasive surfaces, not the best grip on wet rocks or roots
  • Suitability: running any distances and all surfaces but lots of pavement or running on rocks
  • How we go it: Paid full price (disclosure notices)

Bottom line:

To me, Sense Mantra is a great everyday trail running shoe. Would buy them again or one of the other Salomon models built with the same main design.

Online stores that carry Sense Mantra running shoes:

  • $71 – $119 at Amazon.com (various models)
  • $79 – $119 at Backcountry.com both men’s and women’s models
  • $71 – $119 at CampSaver.com both men’s and women’s
  • $109 at GearX.com (Sense Mantra 2 models)
  • $139 CAD at LiveOutThere.com

Photos:

Product description and How we tested it:

When doing research last August on what trail running shoes I want to buy and try this is what I read on Salomon’s website:” A lightweight training shoe for forefoot and midfoot strikers who want natural motion, protection and neutral cushioning for high mileage training.” All that appealed to me since that’s my strike type and that’s what I wanted the shoe for.
Once I had them in my hands I liked the low drop immediately (6mm). However, I like to beat around the bush (BATB) when buying something, so I kept trying the Sense and Salomon SpeedCross 3 on and off. After 20min of BATB-ing I was set on the Sense Mantra since the SpeedCross was putting me into an uncomfortable forward leaning position and high above the ground. This works for some, for me it doesn’t.
Since then I have logged many hours in the Matras. I ran them on sunny days and through some rainy ones as well. I ran them on the softest trails to scrambling abrasive and sharp rocks, all in the Canadian Coast Mountains. Altogether, up to date, this adds up to about 40 runs (or fast hikes) with an average of about 2 hours.
After all this, the cushioning seems to be holding well, it isn’t packing much at all. The fit and feel is still great. However, I would recommend the Mantras more for dry conditions as that’s when they grip well. They are still great on soft ground trails when wet but definitely a bit slippery on wet rock.
The lugs are all still there and doing pretty decent but I can see any time I do a run involving lots of time on rocks that they got just a bit smaller. But I guess the shoe wasn’t really meant for that so it’s OK.
A new thing that I found with the Mantras works well for me is how they don’t really have a tongue but rather a glove-like fitting system that has an integrated minimalist tongue.
Click on the image to the right to see the new Sense Mantra 2 and Sense Pro compared to my Sense Mantra. I don’t know what actually is different about the three of them but the names are.
Before I forget, I want to also mention that I ran and scrambled quite a bit in the Salomon XA PRO 3D Ultra for about 2 years, now wearing them only as dress shoes. Performance-wise, I like the Mantras better but buy the Ultras if you tend to hit your toes here-and-there, they have more protection in the front.
And as a last note, the Mantras are about the 6th pair of Salomon shoes I ever owned – two for hiking, four for trail running.

Pros:

  • These shoes perform absolutely as promised by the Salomon’s marketing department for the type of conditions they are intended for.
  • I prefer low drop and so the only 6mm height difference between the heel and forefoot feels perfect.
  • They fit great on my average width foot.
  • I think that the combination of low drop and low weight they give me a feel of free running like minimalist shoes do but with the added padding I can run in them for much longer, and even strike a heel if I have to.

Cons / What can be improved about this product:

  • There aren’t any negatives about these shoes if you use them for what they were designed for so I won’t repeat what I said about the rocks above.
  • However, they could have better grip on wet.
  • Adding a little bit of more padding to the minimalist tongue would be great as the very thin laces could feel slightly uncomfortable when wearing a thin sock.
  • And my one very personal rant about Salomon running shoes is “give me normal laces for the models I like” J I am not a big fan of the Salomon lacing system but I put up with it their shoes overall are well designed and built.

Online stores that carry Sense Mantra running shoes:

  • $71 – $119 at Amazon.com (various models)
  • $79 – $119 at Backcountry.com both men’s and women’s models
  • $71 – $119 at CampSaver.com both men’s and women’s
  • $109 at GearX.com (Sense Mantra 2 models)
  • $139 CAD at LiveOutThere.com

Filed Under: Gear, Tech & Food Tagged With: Salomon Sense Mantra

  • « Previous Page
  • Page 1
  • …
  • Page 4
  • Page 5
  • Page 6
  • Page 7
  • Page 8
  • …
  • Page 10
  • Next Page »

Primary Sidebar

  • Facebook
  • Instagram
  • YouTube
Our Facebook Page

skimo-manual-banner-300px
 

Recent Articles

  • Kilian Jornet Interview: About His New Foundation, His Own Environmental Impact, and How He Wants To Help Athletes and The Outdoor Industry To Protect Nature
  • How Fast Are Glaciers Really Melting? How Will This Affect Your Mountain Adventures? Interview with Pascal Egli
  • Book Review – Art of Freedom: The Life and Climbs of Voytek Kurtyka
  • Forest Skis: Innovative, Custom Build, For Backcountry Skiing and Freeride
  • Lighter and Completely Redesigned: New CAMP Ultralight Ski Mountaineering Ice Axes

Categories

  • Contests & Giveaways
  • Crazy Tracks
  • Events & Races
  • Gear, Tech & Food
  • General News & Articles
  • Industry Press Releases
  • Movies & Books
  • News Shorts
  • People (Interviews)
  • Racing 101
  • Reports & Results
  • Reviews
  • Skimo Racing
  • Training, Tricks & Tips
  • Trip Reports & Conditions

Footer

About SkinTrack

Travelling through snowy mountains on skis is like flying… and experiencing life at its core.

Gear reviews, interviews, adventures, contests, skills, skimo training, race reports – we connect you to all things related to self-propelled skiing.

SkinTrack.com, created by Stano Faban, was born out of passion for ski mountaineering and ski touring. Over the years, it has become one of the most popular ski mountaineering blogs in North America.

Recent Articles

  • Kilian Jornet Interview: About His New Foundation, His Own Environmental Impact, and How He Wants To Help Athletes and The Outdoor Industry To Protect Nature
  • How Fast Are Glaciers Really Melting? How Will This Affect Your Mountain Adventures? Interview with Pascal Egli
  • Book Review – Art of Freedom: The Life and Climbs of Voytek Kurtyka
  • Forest Skis: Innovative, Custom Build, For Backcountry Skiing and Freeride
  • Lighter and Completely Redesigned: New CAMP Ultralight Ski Mountaineering Ice Axes

Useful Links

Comparing the lightest: Skis | Boots | Bindings

Skimo Training: Training Plans | Videos

Stay in Touch

  • Facebook
  • Instagram
  • Twitter
  • YouTube

Copyright © 2025 SkinTrack.com. All rights reserved.